The shell is only the beginning: building a fiberglass subwoofer enclosure means shaping a mold, applying resin and fiberglass in layers, then removing and finishing the cured shell. Plan on building up about 4-5 layers over the fleece-covered area for a solid form. The result depends on careful layering, not just the shape.
Building a fiberglass subwoofer enclosure involves more than shaping its curves. The layers must bond properly, the shell must fit the vehicle, and the finished enclosure must suit the speaker opening. This guide covers preparing the work area, applying resin and fiberglass, releasing the shell from the mold, and sanding and finishing the surface.
Work through the steps in order, allowing each layer to cure before continuing. From protecting the work area to final sanding, careful preparation turns a custom shape into an enclosure tailored to the available space.
Key Takeaways
- Gather the resin, fiberglass, masking materials, and basic tools before shaping the enclosure so the work can proceed smoothly.
- Apply resin and fiberglass in manageable sections, keeping the material fitted closely to the form as you build the shell.
- Trim and remove the cured shell carefully, then sand progressively to smooth the surface and prepare it for its final finish.
- For a custom fit or a complete audio upgrade, Music In Motion offers custom subwoofer enclosures and car audio installations.
Applying the initial fiberglass shell
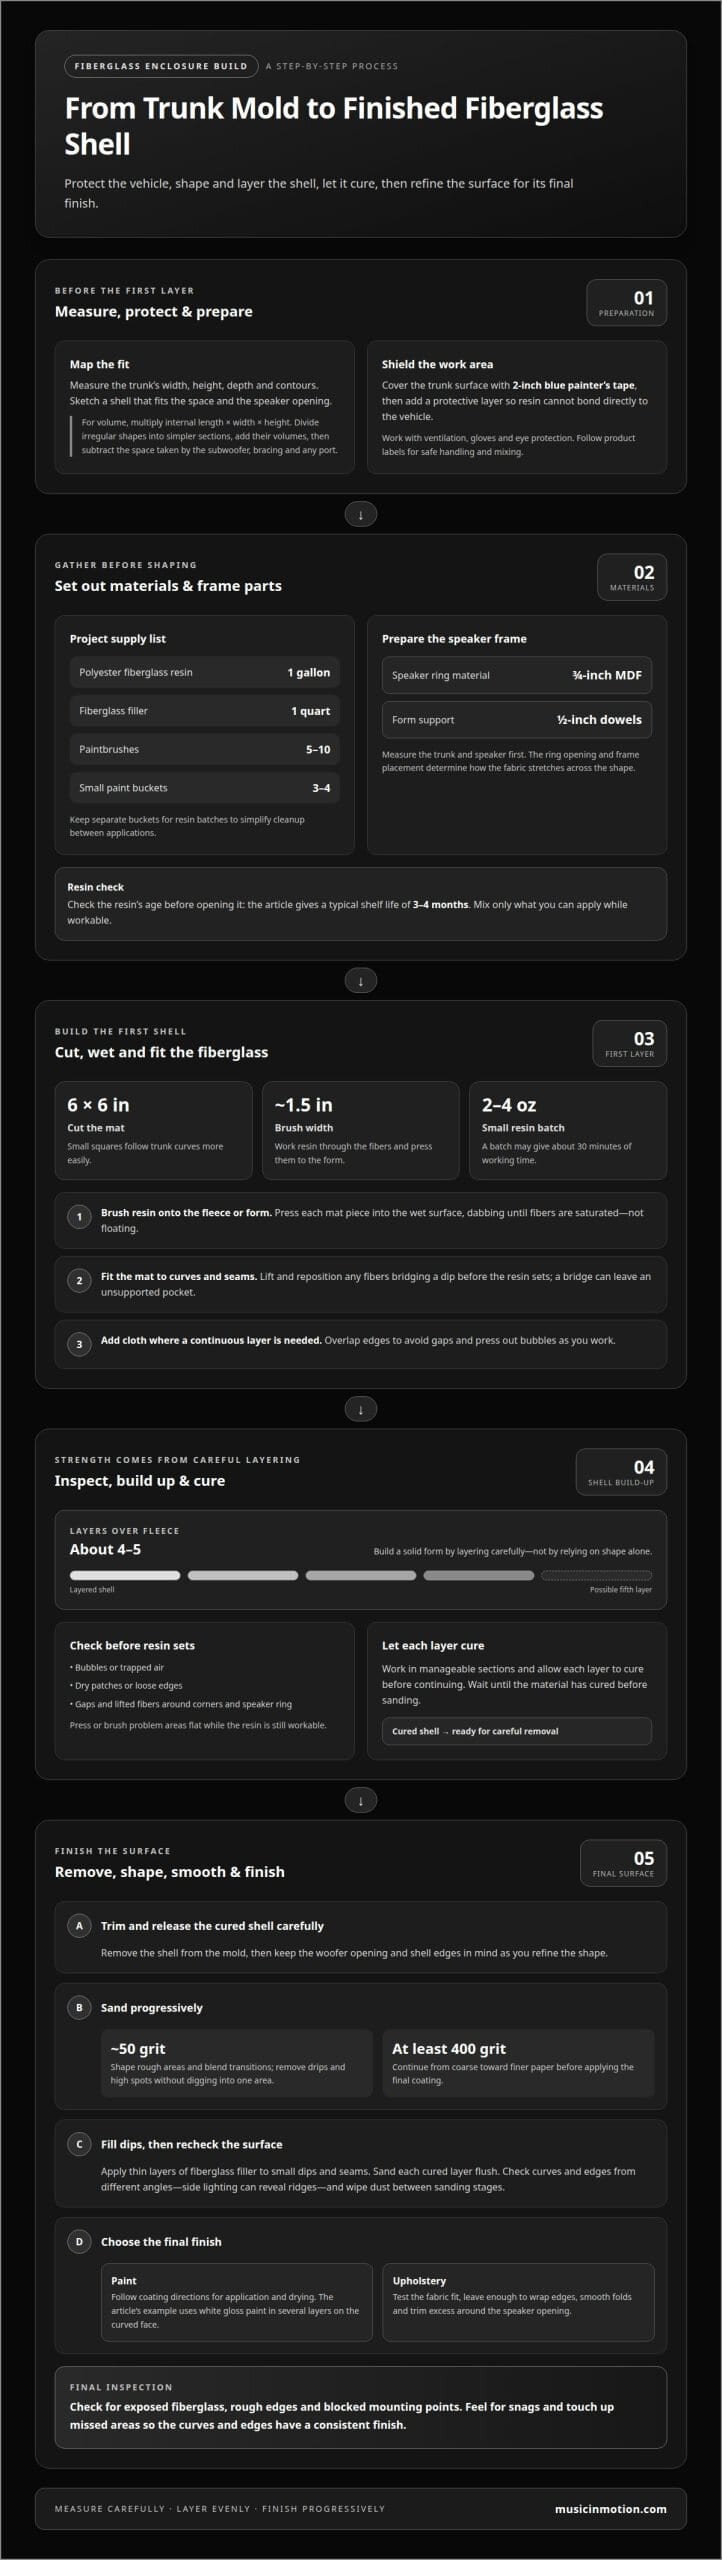
Measure the trunk’s width, height, depth, and contours, then sketch a shell that fits the space and speaker opening. Resin work and sanding require ventilation, gloves, and eye protection. Follow the product labels for safe handling.
-
Apply Fiberglass Mat and Cloth
Cut fiberglass mat into 6-by-6-inch squares before applying it; smaller pieces follow trunk curves more easily. Brush resin over the fleece or form, then press each piece of mat into the wet surface. Use a brush around 1.5 inches wide to work resin through the fibers and smooth them against the shape.
Add fiberglass cloth where you need a more continuous layer. Overlap the edges to avoid gaps, and press out bubbles as you work. Check the corners and speaker ring closely: lifted fibers and trapped air can create weak spots and an uneven surface.
-
Apply Resin and Mat Safely
Mix a small batch of 2-4 ounces of resin at a time, then apply it before it begins to harden. A batch may provide about 30 minutes of working time, so prepare only what you can spread smoothly. Brush resin onto the center of the speaker ring for one or two initial coats.
Lay the mat into wet resin and dab it with a brush until the fibers are saturated, not floating. Work in a ventilated area, protect your skin and eyes, and follow the resin label for mixing and handling. Wait until the material has cured before sanding.
- Shape the first layer over the trunk mold, pressing the mat into curves and seams with a brush. If fibers bridge a dip, lift and reposition them before the resin sets. Otherwise, the bridge can leave an unsupported pocket instead of a smooth shell.
- Inspect the entire surface under good light before leaving it to cure. Look for bubbles, dry patches, loose edges, and gaps around the speaker ring. Press or brush them flat while the resin is still workable.
Materials and tools for a fiberglass enclosure
- List the supplies before cutting fabric or mixing resin. A project materials list includes 1 gallon of polyester fiberglass resin, 1 quart of fiberglass filler, 5-10 paintbrushes, and 3-4 small paint buckets. Keep separate buckets for resin batches to simplify cleanup between applications.
- Mask the vehicle’s interior with 2-inch blue painter’s tape, covering the trunk surface where the shell will form. Add a protective layer over the tape before fiberglassing, so resin cannot bond directly to the vehicle. Set aside gloves and eye protection, and work with ventilation while handling resin.
- Prepare the frame materials before shaping the enclosure. Speaker rings are preferably cut from 3/4-inch MDF, while half-inch dowels can help support the form. Measure the trunk and speaker first; the ring’s opening and frame placement determine how fabric stretches across the shape.
- Check the resin’s age before opening it. Fiberglass resin typically has a shelf life of 3-4 months, so older material may not behave as expected. Set out brushes, buckets, resin, mat, and cloth together, then mix only what you can apply while it remains workable.
- Estimate enclosure volume using the internal dimensions: multiply the length by the width and height. For an irregular shape, divide it into simpler sections, calculate each section, then add the results. Subtract the volume occupied by the subwoofer, bracing, and any port to estimate usable airspace.
- Compare total project materials with the cost of a purchased enclosure. If a custom shape is the priority, custom enclosure planning can help match the design to the vehicle and speaker.
Together, the comments provide a concrete item and cost reference to consider while assembling supplies; they do not change the other listed quantities or replace the need to prepare the vehicle, frame, and work area.
Sanding and finishing the box
- Remove cured resin drips and high spots with a coarse sanding tool, keeping the surface even around the woofer opening. Then use sandpaper around 50 grit to shape rough areas and blend transitions. Move steadily across the shell instead of digging into one spot, which can create low points that need extra bodywork.
- Fill small dips and seams with fiberglass filler, often called Bondo, following the product directions. Apply thin layers over uneven areas, then sand each cured layer until it sits flush with the shell. Check the curved face and edges from different angles; side lighting can reveal ridges that look smooth head-on.
- Refine the surface in stages, moving from coarse paper toward finer grits. The builder recommends sanding up to at least 400 grit before applying the final coating. Wipe away sanding dust between stages so loose particles don’t scratch the next pass or become trapped beneath paint.
- Seal and finish the enclosure once the bodywork leaves an even surface. In one painted example, the builder applied white gloss paint to the curved face in several layers. Follow the coating instructions for application and drying, and keep paint from building up around the woofer opening and mounting surfaces.
- Choose paint or upholstery based on the intended look and how the enclosure will be installed. For carpet, cut fabric to cover the curved face and sides, leaving enough to wrap the edges neatly. Test the fit before attaching it, smooth folds as you work, and trim excess around the speaker opening once the fabric is positioned.
- Before installing the woofer, inspect the finished enclosure for exposed fiberglass, rough edges, and blocked mounting points. Carefully run a hand over the exterior to find snags, then touch up missed areas. A consistent finish across the curves and edges gives the enclosure a clean, integrated look.
The guide author measured the finished enclosure at approximately 1.2 cubic feet using packaging peanuts. This provides a check of the box’s internal capacity alongside the visual inspection of the exterior and mounting areas.
Building up fiberglass layers and removing the shell
Build strength with continuous, well-bonded layers, and release the shell only after it has cured. A carefully made mold and supported baffle help reduce weak spots, air leaks, and rattles.
- Prepare the trunk mold with two crossed layers of masking tape, extending 3-4 inches beyond the planned enclosure area. Cover the full contact surface and overlap tape edges so resin cannot reach the vehicle. This forms the barrier that lets you remove the shell later.
- Lay fleece or fabric over the mold and trim it with about 2 inches of extra material beyond the enclosure edge. Keep it taut around curves and corners, but avoid pulling so hard that the shape shifts. The fabric creates the shell’s form; the fiberglass layers provide its structure.
- Let the first fiberglass layer dry for about 2 hours before adding more. Then laminate 4-5 layers over the fleece-covered area, wetting each layer thoroughly and working out trapped air. Overlap mat pieces and inspect corners, seams, and transitions for gaps before the resin cures.
- Wear gloves when handling resin and hardener, and follow the resin label for mixing. Aim for an even shell instead of relying on a thick patch in one spot. Fiberglass gains strength from bonded layers and curved forms; unsupported flat sections can flex.
- Reinforce the speaker opening with a stable baffle, using 3/4-inch MDF when the design allows. Attach the baffle securely to the frame, then laminate the shell to its edges. Check the joint around the entire opening; a continuous connection helps prevent air leaks and movement that can cause rattles.
- Once the shell is fully cured, ease it away from the taped trunk surface without forcing one edge. Inspect the inside for dry fibers, gaps, or loose sections, then reinforce those areas before installation. For a custom enclosure shaped to your vehicle, plan a custom subwoofer enclosure with Music In Motion.
Music In Motion: Car Audio Upgrades
Music In Motion can help integrate a custom enclosure into a broader car audio upgrade. The enclosure, subwoofer, and installation need to work together in your vehicle, so a custom fit is only one part of the system. Music In Motion provides custom subwoofer enclosures and custom installations for a tailored solution. For audio projects on the water, the company also offers Marine Audio Systems. Whether you’re planning a new enclosure or updating an existing sound system, discuss your vehicle and the result you want with Music In Motion.
Plan the next step for your sound system
Building a fiberglass subwoofer enclosure lets you shape the box around your vehicle, but the finished system also depends on how it works with the rest of the audio setup. As you plan the installation, consider how the enclosure and subwoofer suit your listening goals. This broader view helps connect a custom component to the sound experience you want.
If building a fiberglass subwoofer enclosure is part of a larger audio project, Music In Motion offers Car Audio Upgrades and Custom Installations. The team also offers Marine Audio Systems for boat audio projects. To discuss how an enclosure could fit your setup, contact Music In Motion about your audio project. Take the next step when you’re ready and shape a system around your vehicle and preferences.
Frequently Asked Questions
What tools and materials are needed to build a fiberglass subwoofer enclosure?
Gather fiberglass resin, hardener, mat, cloth, fleece, masking materials, brushes, mixing containers, and a tool for cutting fiberglass. You’ll also need a speaker ring and supporting frame materials suited to the design. Keep clean containers for mixing batches, and place cutting tools beside the work area so you can size each piece before applying resin.
How many layers of fiberglass mat and resin are needed for a subwoofer enclosure?
Plan on 4-5 fiberglass layers over the fleece-covered area for the shell. The right build also depends on how well each layer is saturated and bonded, not just the layer count. Inspect curves, seams, and flat sections as you work; trapped air or uncovered gaps can leave weak areas that need attention before the resin cures.