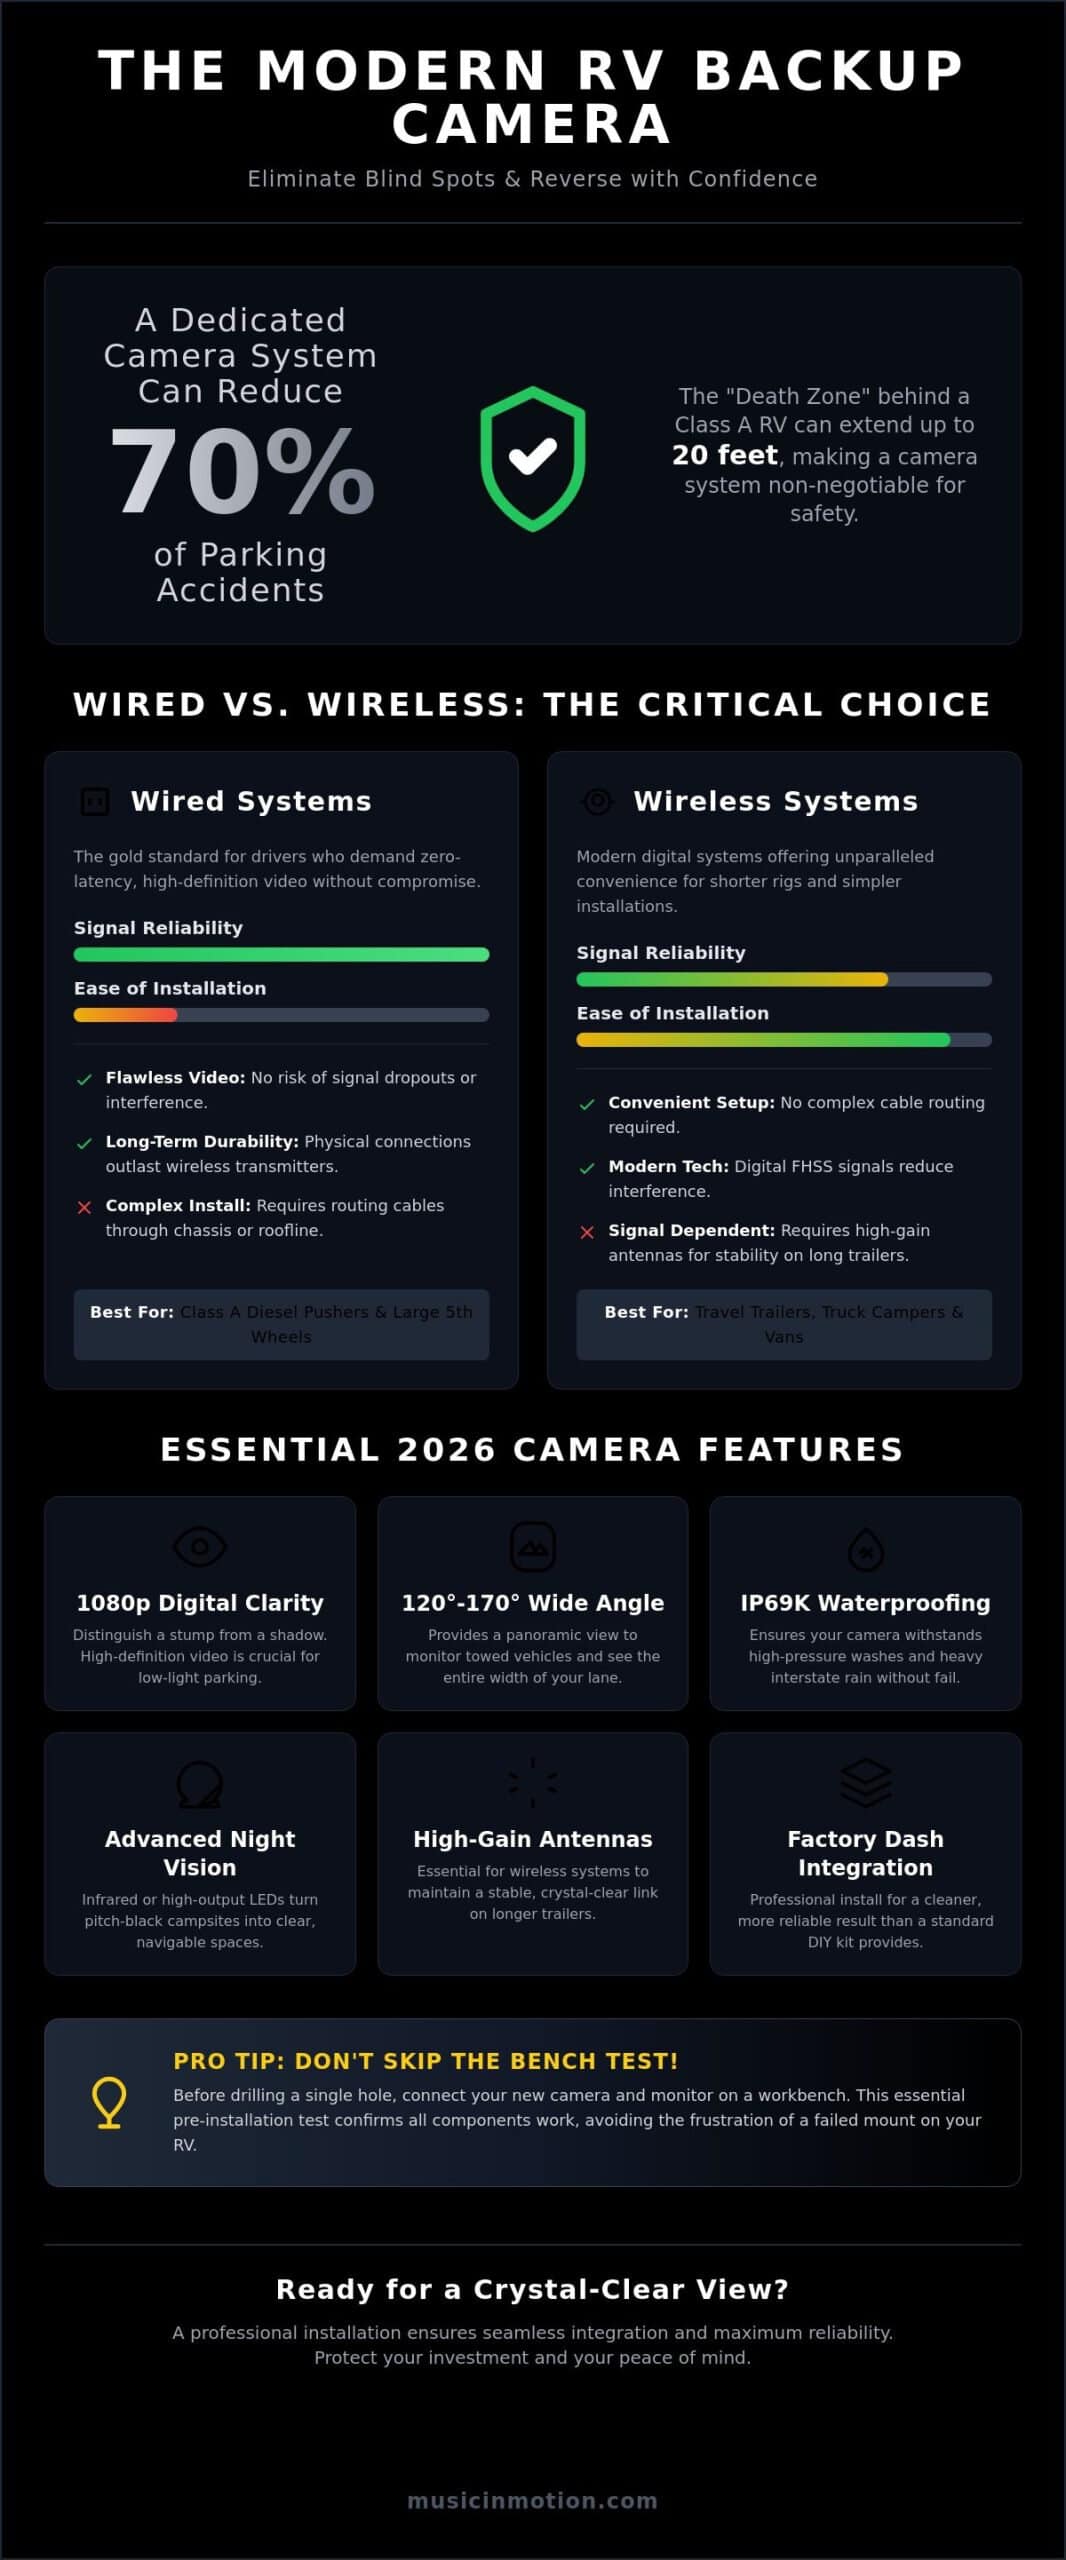
Did you know that utilizing a dedicated camera system can reduce parking accidents by as much as 70%? Even with those odds, many owners hesitate because a professional RV backup camera install feels like a high-stakes gamble. We understand that fear. You’ve invested a lot into your mobile lifestyle, and the thought of drilling into a pristine fiberglass shell or dealing with signal dropouts on a thirty-foot trailer is daunting. It’s common to feel stuck between the need for safety and the desire to keep your rig’s exterior intact.
We are here to show you that a clear view doesn’t have to come with a compromise. This guide provides the expertise you need to master the complexities of modern installation and eliminate blind spots for good. We’ll walk through the reliability of hardwired connections versus the latest 2026 wireless innovations that use solar power and magnetic mounts. You’ll learn how to achieve seamless dash integration and a crystal-clear perspective of what’s behind you. By the end, you will have the confidence to reverse into the tightest campsites without a second thought.
Key Takeaways
- Discover how high-definition sensors transform difficult low-light campsite arrivals into stress-free maneuvers.
- Learn the critical differences between wired and wireless systems to determine the best approach for your specific RV backup camera install.
- Avoid the frustration of a failed mount by mastering the essential pre-installation bench test for your camera and monitor.
- Identify common causes of signal lag and how to utilize high-gain antennas to maintain a crystal-clear view on long trailers.
- Find out why professional weatherproofing and factory dash integration offer a cleaner, more reliable result than standard DIY kits.
Why an RV Backup Camera System is Non-Negotiable in 2026
Driving a modern motorhome without a dedicated rear-view system is like trying to navigate a maze with one eye closed. As RV designs evolve toward greater lengths and more complex slide-outs, the gap between what you see and what is actually there grows wider. Traditional side mirrors are helpful, but they cannot see through the back wall of your coach. In 2026, we view a professional RV backup camera install as a safety requirement rather than a luxury. It is the only way to ensure you have a complete picture of your surroundings at all times.
Eliminating the “Death Zone” Behind Your Coach
Most Class A and Class C motorhomes suffer from a massive “death zone” that extends up to 20 feet behind the rear bumper. This area is completely invisible to the driver using standard mirrors alone. We solve this problem by utilizing wide-angle lenses, often ranging from 120 to 170 degrees, to provide a panoramic view of the road. These vehicle safety systems are the foundation of modern RVing; they allow you to monitor towed vehicles and clear lanes with absolute certainty. When you can see the entire width of the lane behind you, the anxiety of highway driving simply disappears.
The Evolution of RV Camera Technology
The hardware has come a long way from the grainy, flickering analog signals of the past. Today, we focus on 1080p digital clarity that rivals your home television. This shift in Backup camera technology ensures that you can distinguish between a small stump and a shadow in a dimly lit campsite. Reliability is equally important. We prioritize components with an IP69K waterproof rating, which means the camera can withstand high-pressure washdowns and hours of heavy rain on the interstate. For those late-night arrivals, modern systems offer advanced night vision using infrared or high-output LED illumination to turn pitch-black surroundings into clear, navigable spaces.
Beyond the immediate parking benefits, a high-quality rear-view system acts as a persistent digital mirror while you are in motion. This constant feed is invaluable for spotting aggressive drivers or checking the stability of your trailer hitch. In 2026, many insurance providers also recognize the value of recorded rear-view footage. Having a digital record of what happened behind your vehicle can be a game-changer for legal protection and insurance claims. We believe that every mile should be enjoyed, and that starts with knowing exactly what is happening in every direction around your rig. A proper RV backup camera install doesn’t just protect your vehicle; it protects your peace of mind.
Evaluating Wired vs. Wireless Backup Camera Systems
Deciding between a wired or wireless system is the most pivotal moment of your RV backup camera install. It is a choice between immediate convenience and long term signal stability. While Federal Motor Vehicle Safety Standard No. 111 mandates rear visibility for lighter vehicles, the sheer scale of a motorhome makes meeting that standard a unique technical challenge. We’ve seen that the right choice depends entirely on your vehicle’s length and your tolerance for technical maintenance during an RV backup camera install.
Wired Systems: Reliability for Long-Haul Drivers
Wired systems are the gold standard for drivers who demand zero latency and high definition video. We almost always recommend these for Class A diesel pushers and large fifth wheels. Because the video travels through a physical cable, there is no risk of signal dropouts or interference from nearby electronics. The installation is more complex; it requires routing cables through the chassis or along the roofline. However, physical connections outlast wireless transmitters every time. They don’t suffer from the hardware fatigue that can plague wireless components over years of exposure to the elements. If you are looking for a permanent, “set it and forget it” solution, a wired system is the answer.
Digital Wireless: When Convenience Makes Sense
Modern digital wireless has replaced the grainy, flickering analog signals of the past. Older 2.4GHz analog systems were notorious for picking up interference from other drivers or even microwave ovens. Today, we look for digital FHSS (Frequency Hopping Spread Spectrum) signals. These systems are ideal for smaller travel trailers, truck campers, or vans where the distance between the camera and monitor is relatively short. To identify a high-quality kit, look for external, high-gain antennas on both the camera and the monitor. These are essential for maintaining a stable link through the metal and wood of your rig’s construction.
The “Signal Gap” is a reality for any trailer over 30 feet. Even the best wireless signals can struggle when they have to pass through multiple layers of aluminum siding and internal appliances. This often results in a stuttering image or complete signal loss at highway speeds. Power is another factor to consider. Both systems typically tap into 12V DC power from the reverse lights or running lights. While some wireless cameras offer battery or solar options, we find that a direct power tap is far more reliable for consistent performance. If you’re feeling overwhelmed by the technical specs, our experts at Music In Motion can simplify the process for you.
Step-by-Step RV Backup Camera Install Guide
Before you pick up a drill, you must perform a bench test. We always recommend powering up the camera and monitor while they are still in the box. This simple step ensures the components are communicating correctly before you spend hours on labor. Once you’ve confirmed the signal is strong, the real work begins. A successful RV backup camera install depends on precision and patience. We start by finding the center point of the rear cap, usually just below the center clearance light. This height provides the best depth perception for both parking and highway monitoring.
Scenario A: Installing on a Pre-Wired RV
Many modern rigs from manufacturers like Keystone or Grand Design come “camera ready.” You’ll often see a small plastic bracket from brands like Furrion or Voyager. Installing here is straightforward. We remove the weather seal and pull out the proprietary plug hidden behind the plate. After connecting the camera, we pay close attention to the gasket. It must be seated perfectly flush against the body. A pinched gasket is a common cause of roof leaks, so we take the extra time to ensure a watertight seal before tightening the mounting screws.
Scenario B: Custom Wiring for Non-Prepped Rigs
If your rig didn’t come with a factory bracket, you have a custom project on your hands. This is where most DIY guides fall short. We typically route cables through interior cabinetry or use under-mount conduits to protect the wiring from road debris. When we make an exterior penetration, we use professional-grade rubber grommets and high-quality silicone sealant. For the most reliable experience, we connect the power to a dedicated 12V circuit or the reverse trigger wire. This allows the system to activate automatically the moment you shift into reverse, providing instant visibility when you need it most.
Integrating Side-View Cameras
For total vehicle awareness, we often expand the system to include side-view cameras. These are excellent additions to a blind spot detection system aftermarket upgrade. We wire these cameras directly to your turn signal triggers. When you flip your blinker to the left, the monitor automatically switches to that camera’s feed. Multi-channel monitors make this seamless. You can choose between a split-screen view to see everything at once or an automatic switching mode that prioritizes the most relevant angle. Whether you prefer a dash mount or a mirror overlay, the goal is a clean, integrated look that feels like a factory feature.
Solving Signal Interference and Vision Gaps
A backup camera is only as good as its signal stability. Even after a successful RV backup camera install, you might encounter frustrating signal lag or visual distortion. This is particularly common on trailers over 30 feet, where the distance between the transmitter and receiver pushes the limits of standard consumer hardware. We’ve found that the structural materials of your rig, like aluminum siding and steel frames, often act as barriers to a clean signal. This creates a “Faraday cage” effect that can drop your frame rate just when you need it most.
When wireless signals struggle, we turn to high-gain antennas and signal boosters. These aren’t just simple extensions; they are active components that amplify the frequency to cut through the noise. If you are experiencing a “stuttering” image at highway speeds, it’s usually a sign that your signal is being swallowed by the distance. Moving the antenna to the roofline or using a booster can bridge that gap. For wired systems, “ghosting” or flickering is often the result of poor cable shielding or an unstable ground. We fix this by using professional-grade, double-shielded cables that protect the video feed from the electrical noise of the engine.
Managing Electromagnetic Interference (EMI)
Your RV is a rolling hub of electronic activity. High-power appliances like air conditioning units and microwave ovens can create significant electromagnetic interference. This noise often disrupts wireless camera feeds, causing the screen to go black or display static. In high-end wired installs, we prioritize shielded RCA cables to prevent this crosstalk. We also pay close attention to grounding. A poor ground connection can introduce engine noise into the video feed, resulting in horizontal lines that crawl up the screen. Ensuring a clean, chassis-grounded connection is essential for a stable picture.
Optimizing the Field of View
Seeing behind you is one thing; understanding the distance is another. We follow the “Three Zone” rule to ensure total coverage. Zone one is your rear bumper, zone two is the area ten feet behind you, and zone three is the horizon. If your camera angle is too low, you lose the horizon and can’t monitor traffic. If it’s too high, you can’t see the hitch. We often recommend dual-lens cameras that provide two simultaneous views: one pointed down for backing up and one pointed back for highway driving. Calibrating your distance grid lines to match your specific RV length is the final step in turning a simple camera into a precision tool. If you want to ensure your system is perfectly calibrated for your next trip, reach out to us for a professional safety system consultation.
Professional Integration: Beyond the Basic DIY Kit
Most off-the-shelf kits leave you with a cluttered dashboard and a tangle of suction cups. We believe your safety tech should look like it belongs there. A professional RV backup camera install allows us to integrate the video feed directly into your factory dash screen or a high-resolution rearview mirror. This creates a clean, intentional look that doesn’t distract you from the road. We prioritize seamless wire management and professional weatherproofing to ensure your system survives the vibration and moisture of long-distance travel. Our goal is to provide a tool that feels like a natural extension of your vehicle.
The Hidden Costs of DIY Mistakes
A minor mistake during a self-install can lead to major expenses down the road. Improper drilling is a common culprit for roof leaks and fiberglass delamination, which can cost thousands to repair. There are also warranty concerns when you start tapping into complex factory electrical harnesses without the proper schematics. When you evaluate the dash cam installation cost versus the price of a structural repair, the value of professional expertise becomes clear. We treat your vehicle with the same care we would our own. We use specialized sealants and strain-relief techniques that DIY kits simply don’t provide.
Custom Safety Solutions for Every Vehicle
We specialize in total vehicle awareness. This often means combining your rear-view system with a professional RV dash cam installation. This creates a 360-degree safety net that records every angle of your journey. Whether you are maneuvering a 45-foot Class A diesel pusher or a compact fifth wheel, our team has the specialized knowledge to enhance it. We don’t just hand you a box of parts; we deliver a finished, integrated result that works perfectly from the moment you turn the key. No rig is too large or too complex for our custom fabrication team.
Our philosophy centers on the internal experience of the user. We want you to feel confident, not overwhelmed. Every project we undertake is a collaborative effort to improve your daily life behind the wheel. We take pride in our growth and evolution, yet we remain grounded and faithful to our customer base. If you are ready to eliminate the blind spots and protect your investment, contact us for a tailored safety consultation. We are passionate about our craft and dedicated to the safety and functionality of your rig. Let us help you turn your next road trip into a stress-free adventure.
Take Command of Your Journey With Total Visibility
Mastering your environment is the key to enjoying every mile of your journey. We’ve explored how a strategic RV backup camera install eliminates the dangerous “death zone” behind your coach. Modern digital signals and high-definition sensors now provide the clarity needed for even the most difficult campsite arrivals. You deserve a setup that integrates seamlessly with your dash and withstands the rigors of the road without the clutter of DIY kits.
We bring over 30 years of custom vehicle electronics experience to every rig we touch. Our team is specialized in high-performance RV safety integration; we’ve built a nationwide reputation for clean, reliable custom fabrication. We don’t just sell hardware; we deliver a finished result that transforms your internal experience behind the wheel. Upgrade your rig with a professional RV backup camera system from Music In Motion and gain the confidence to explore further. We look forward to helping you customize your rig for the many adventures ahead.
Frequently Asked Questions
Can I install a backup camera on an RV that is not pre-wired?
Yes, you can install a system on any rig regardless of factory prep. We specialize in custom routing for older or non-prepped coaches by running cables through interior cabinetry or protective under-chassis conduits. This ensures your RV backup camera install is clean and permanent. We use high-quality sealants for every exterior penetration to keep your interior dry and protected from the elements.
Will a wireless backup camera work on a 40-foot trailer?
Standard wireless systems often face signal dropouts on trailers of this length. While modern digital FHSS signals are improved, the distance and metal siding of a 40-foot trailer create significant interference. We recommend a hardwired system for maximum reliability. If you must go wireless, you’ll need high-gain antennas or a signal booster to maintain a stable, high-definition feed while traveling at highway speeds.
Where is the best place to mount a camera on the back of an RV?
The optimal mounting location is high on the rear cap, centered just below the middle clearance light. This elevated position provides a wide field of view that includes both your bumper and the horizon. It gives you the best depth perception when reversing into tight spots. We always ensure the camera is angled correctly to eliminate blind spots without losing sight of trailing traffic or towed vehicles.
How do I power my RV backup camera so it stays on while driving?
You should connect the camera to your rig’s running lights or a dedicated 12V accessory circuit. Many people tap into the reverse lights, which only powers the system when you are in gear. By using the running lights, the camera stays active as long as your lights are on. This allows you to use the monitor as a digital rearview mirror for constant observation during your entire trip.
Can I connect an aftermarket backup camera to my factory dash screen?
Yes, we can integrate aftermarket cameras with most factory infotainment screens using specialized interface modules. This eliminates the need for extra monitors cluttering your dashboard. It provides a seamless, factory-finish look while maintaining all your original dash functions. We identify the specific video input requirements for your vehicle’s make and model to ensure the image is crisp and activates automatically when needed.
Is it better to wire the camera to the reverse lights or the running lights?
We recommend wiring to the running lights if you want a constant observation feed. Tapping into the reverse lights is only ideal if you exclusively want the camera to turn on while backing up. Using the running lights provides more versatility, especially for monitoring a trailer hitch or watching for approaching vehicles on the highway. It turns your camera into a persistent safety tool rather than just a parking aid.
What is the average time for a professional RV backup camera install?
A professional RV backup camera install typically takes between one and four hours depending on the complexity of your rig. Simple wireless setups on pre-wired coaches are on the faster end of that spectrum. Custom hardwired installations on large Class A motorhomes require more time for careful cable routing and dash integration. We prioritize a meticulous process to ensure every wire is protected and every seal is watertight.
Do I need a special monitor for a multi-camera RV system?
You will need a multi-channel monitor designed to handle multiple video inputs simultaneously. These monitors allow for split-screen views or automatic switching when you activate your turn signals. Standard single-input monitors cannot display side-view and rear-view feeds at the same time. We help you select a monitor that matches your specific camera count to provide a comprehensive, 360-degree view of your surroundings.


