The most expensive speakers in the world will sound flat and distorted if they are forced to play frequencies they were never built to handle. Getting car audio crossover settings explained in practical terms is the critical bridge between installing quality hardware and actually experiencing breathtaking sound behind the wheel.
We know how intimidating it feels to stare at tiny amplifier dials, head unit menus, and complex processor software, wondering if a single misplaced tweak might fry a delicate tweeter or turn your midbass into a muddy mess. You invested in upgraded gear to enjoy clean, punchy bass and crystalline high frequencies, not to second-guess your audio settings. In this guide, you will master the exact roles of high-pass, low-pass, and band-pass filters so you can eliminate distortion and protect your equipment with total confidence. From proven starting points like the standard 80 Hz cutoff to optimal slope selections, we’ll walk you through dialling in precise frequency thresholds for every speaker in your vehicle.
Key Takeaways
- Discover how proper frequency routing acts as acoustic traffic control, protecting delicate tweeters from low-end damage while maximizing clarity.
- Understand the functional differences between passive inline crossovers and active DSP signal management for precise multi-channel control.
- Demystify crossover slopes and filter rolloffs to eliminate muddy frequency overlap between your subwoofers and midbass door speakers.
- Get essential car audio crossover settings explained with proven starting cutoffs for every speaker driver in your sound system.
- Follow a reliable step-by-step tuning sequence to clear out conflicting processor settings and achieve clean, distortion-free output.
Understanding Car Audio Crossovers: What They Do and Why Settings Matter
Every speaker driver inside your vehicle is engineered to reproduce a specific band of sound. Subwoofers move large volumes of air to create visceral low notes, while compact tweeters oscillate thousands of times per second to generate shimmering highs. Audio crossovers act as specialized electrical traffic controllers, splitting the complex, full-range audio signal sent from your head unit and routing the right frequencies to the appropriate drivers. Having practical car audio crossover settings explained clearly makes all the difference between hollow, flat playback and rich, dynamic fidelity.
Without proper filtering, your components step outside their acoustic comfort zones. Overlapping frequency bands clutter the cabin with phase cancellations, muddying vocal clarity and smearing the soundstage. Correct crossover calibration serves as the vital bridge connecting your equipment, amplifier channels, and speakers into a single, cohesive listening experience.
The Core Filter Types: High-Pass, Low-Pass, and Band-Pass
To tune your system effectively, you must master the three foundational filter types found on modern amplifiers and signal processors:
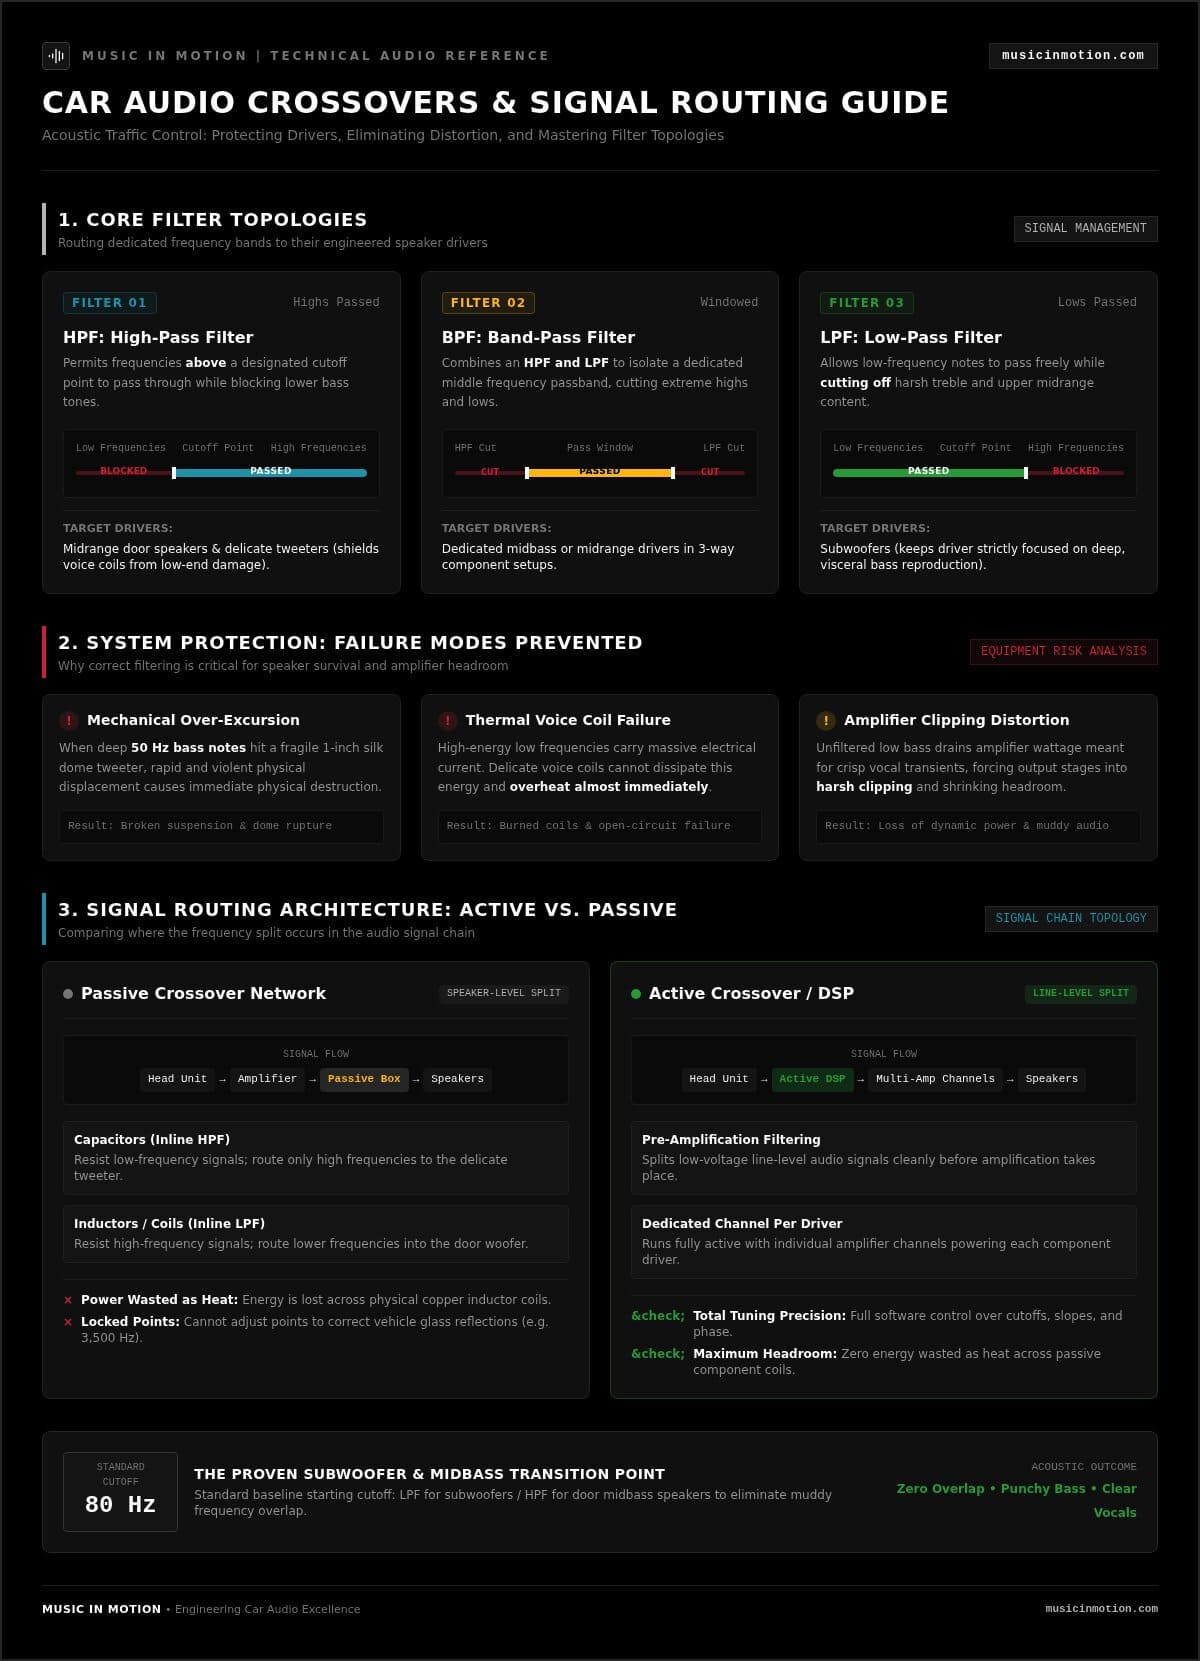
- High-Pass Filter (HPF): Permits frequencies above a designated cutoff point to pass through while blocking lower bass tones. It is primarily used to shield midrange door speakers and tweeters from damaging low-end energy.
- Low-Pass Filter (LPF): Allows low-frequency notes to pass through freely while cutting off harsh treble and upper mid-frequencies. This keeps subwoofers focused strictly on deep bass reproduction.
- Band-Pass Filter (BPF): Combines an HPF and an LPF to create an isolated frequency window. It lets a specific middle band pass through, making it ideal for dedicated midbass or midrange drivers in three-way component setups.
Why Proper Crossover Settings Prevent Distortion and Blown Drivers
Thermal failure and mechanical over-excursion represent the two biggest threats to aftermarket speakers. When deep 50 Hz bass notes hit a fragile one-inch silk dome tweeter, the driver attempts rapid, wide physical movements it cannot survive. The voice coil overheats almost immediately, resulting in permanent physical failure.
Unfiltered bass frequencies also waste valuable amplifier power. Forcing door speakers to reproduce sub-bass drains wattage that should drive crisp vocal transients, pushing the amplifier into harsh clipping distortion. Dialling in precise car audio crossover settings explained across your gear preserves available amplifier headroom, protects your voice coils, and ensures every watt delivers effortless clarity.
Active vs. Passive Crossovers: How Modern Signal Routing Works
Signal routing determines how cleanly your music reaches each driver, and systems divide this task between two primary architectures: active and passive. The core difference lies in where the frequency split happens along the audio signal path. Understanding this distinction is essential when having car audio crossover settings explained for real-world tuning.
Passive crossovers split amplified speaker-level audio, whereas active crossovers split low-voltage signals before amplification begins. That simple structural difference impacts tuning flexibility, total system efficiency, and overall sound quality.
Passive Crossover Networks in Component Speaker Systems
Most off-the-shelf component speaker packages come packaged with passive crossover boxes. These units wire in directly between a single amplifier channel and the paired woofer and tweeter. Inside the casing, passive networks rely on physical inductors, resistors, and capacitors to route frequencies:
- Capacitors: Resist low-frequency signals, functioning as an inline high-pass filter for the tweeter.
- Inductors (coils): Resist high-frequency signals, functioning as a low-pass filter for the door woofer.
While passive networks keep wiring simple, they waste electrical amplifier power as heat across those internal copper coils. More importantly, their crossover points are physically locked. If your vehicle glass creates harsh reflections around 3,500 Hz, you cannot adjust the crossover frequency to tame that brightness.
Active Crossovers and Digital Signal Processors (DSP)
Active filtering operates at line-level signal strength before the audio ever reaches an amplifier channel. This setup requires an individual amplifier channel for every driver in the vehicle, an arrangement known as running fully active. While this adds hardware channels, it hands you absolute acoustic authority.
Modern digital signal processors represent the peak of active signal management. Through software, you can manipulate crossover cutoffs in single-Hertz increments, swap filter slopes in seconds, and correct cabin-induced acoustic delays with individual speaker time alignment. See how active tuning elevates a car audio upgrade for stock stereo systems by correcting poor factory frequency responses without tearing out the original dashboard receiver.
Deciding between active and passive depends on your goals. Passive networks offer straightforward, budget-conscious protection. Active DSP configurations require specialized calibration knowledge, but they eliminate acoustic compromise and unleash the full potential of your drivers. If you want seamless results without the setup trial and error, partnering with the team at Music In Motion ensures your multi-channel hardware is dialed in for balanced, reliable performance from day one.
Deciphering Crossover Slopes and Filter Alignments
A crossover frequency does not act as an impenetrable brick wall. When you set a low-pass filter at 80 Hz, your subwoofer does not suddenly stop playing all content at 81 Hz. Instead, the output gradually diminishes as frequencies move away from your chosen cutoff point. This gentle decline is known as the crossover slope, and it dictates how smoothly one speaker blends into the next. To truly have car audio crossover settings explained, you must understand the rate of this rolloff and the phase relationships it creates inside the vehicle cabin.
Every electrical filter alters the phase of the audio wave it shapes. If the sound waves leaving your door woofers and subwoofers arrive at your ears out of alignment, they collide and cancel each other out. That cancellation robs your vehicle of low-end impact, leaving the bass sounding hollow and thin.
Understanding Decibels Per Octave: 6dB, 12dB, 18dB, and 24dB
Filter steepness is measured in decibels of attenuation per octave (dB/octave), where an octave represents a doubling or halving of frequency. Filter orders dictate this behavior:
- 6 dB/octave (1st Order): A very gradual slope that introduces a 90-degree phase shift. It allows too much unwanted low-frequency energy through to smaller drivers, risking distortion.
- 12 dB/octave (2nd Order): The most common analog amplifier standard. It introduces a 180-degree phase shift, completely inverting the electrical polarity at the cutoff point. Inverting speaker leads is often necessary here to prevent bass cancellation.
- 18 dB/octave (3rd Order): Produces a 270-degree phase shift, balancing aggressive attenuation with moderate phase rotation.
- 24 dB/octave (4th Order): Features a steep, surgical cutoff with a full 360-degree phase shift. Because 360 degrees completes a full rotation, the acoustic output returns in phase with adjacent drivers.
Butterworth vs. Linkwitz-Riley Filter Curves and Phase Coherence
When tuning an active DSP, you will encounter filter alignment options, most notably Butterworth and Linkwitz-Riley curves. Butterworth filters prioritize a completely flat passband, but they exhibit a 3 dB bump at the crossover frequency where two channels overlap. In contrast, Linkwitz-Riley filters are down 6 dB at the cutoff frequency. When the high-pass and low-pass signals blend acoustically in your car, they sum to a perfectly flat, seamless handoff.
For active multi-channel systems, a 24 dB per octave Linkwitz-Riley (LR4) filter represents the standard industry benchmark. It isolates drivers quickly, protects fragile voice coils, and preserves total phase coherence between your subwoofers, midbass drivers, and tweeters.
Recommended Crossover Settings by Speaker Type and Frequency Range
Every driver diameter has physical boundaries that dictate which musical notes it can accurately reproduce. Having car audio crossover settings explained driver by driver provides an immediate roadmap for clean sound, whether you are running a simple two-way setup or a fully active three-way stage. Use these baseline cutoffs as tested starting points for your vehicle:
- Subwoofers (10″ to 12″): Low-pass filter set at 70 Hz to 80 Hz; subsonic filter engaged.
- Midbass Woofers (6.5″): High-pass filter set at 80 Hz (up to 3,500 Hz in two-way setups).
- Midrange Drivers (3″): Band-pass filter configured between 300 Hz (HPF) and 3,500 Hz (LPF).
- Tweeters (1″): High-pass filter set between 3,500 Hz and 4,000 Hz.
Subwoofer Low-Pass and Subsonic Filter Tuning
Setting your subwoofer low-pass filter to 80 Hz creates an ideal starting acoustic benchmark. This cutoff routes heavy kick drums and deep bass lines into your sub without allowing muddy vocals to leak into the trunk. If your bass feels loose, dropping the filter to 70 Hz often tightens the impact.
Ported enclosures require special protection. Below a ported box’s tuning frequency, the woofer loses air resistance and enters free-air unloading, causing severe mechanical over-excursion. The standard rule is to set your subsonic filter roughly half an octave below the enclosure’s port frequency. For a box tuned to 35 Hz, dial your subsonic filter to approximately 25 Hz. Pairing these adjustments with bespoke enclosures from our custom car audio fabrication team ensures maximum deep bass output without risking driver damage.
Midbass Door Speakers and 3-Way Midrange Calibration
Standard 6.5-inch door woofers deliver punchy drum impacts when freed from sub-bass duties. Activating an 80 Hz high-pass filter prevents the cone from bottoming out against the magnet assembly during heavy bass drops. This relief keeps your door cards from buzzing and dramatically lowers harmonic distortion.
In three-way active systems, dedicate midbass woofers from 80 Hz to 350 Hz, then band-pass your 3-inch dashboard midranges from 350 Hz to 3,500 Hz. This places the critical vocal spectrum right onto the windshield for exceptional stage height.
Tweeter Protection and High-Frequency Points
Tweeters feature tiny voice coils that cannot dissipate low-frequency energy. Never set an active high-pass filter below twice the tweeter’s resonant frequency rating. Standard one-inch silk dome tweeters thrive with a high-pass filter dialed to 3,500 Hz using a steep 24 dB slope. If you are tuning active channels without extensive DSP experience, keep an inline protection capacitor wired to the positive terminal as a failsafe.
Dialling in your audio gear takes precision and patience. To bypass the guesswork and experience flawless clarity on your daily commute, contact our team at Music In Motion to calibrate your vehicle with professional-grade acoustic tools.
Step-by-Step Guide to Setting Crossovers on Your Amplifier or DSP
Dialing in your system requires a logical calibration sequence. Setting frequencies haphazardly leads to muddy sound, cancellation, or damaged equipment. Use this disciplined tuning process to put these car audio crossover settings explained into practice inside your vehicle:
- Step 1: Defeat overlapping tone controls, bass boosts, and internal equalizers across your source unit.
- Step 2: Select the proper hardware filter mode (HPF, LPF, or Flat) on your amplifier chassis.
- Step 3: Calibrate cutoff points using dedicated test tones rather than relying on painted chassis dials.
- Step 4: Conduct focused acoustic listening tests and verify driver phase coherence with dynamic reference tracks.
- Step 5: Fine-tune channel levels with specialized acoustic tools or commission a professional calibration.
Preventing Crossover Stacking Between Stereo and Amplifier
One of the most frequent tuning errors occurs when enthusiasts inadvertently stack filters. If you turn on an 80 Hz high-pass filter in your aftermarket touchscreen head unit and activate an 80 Hz high-pass filter on your four-channel amplifier, you cascade two separate electrical networks onto the same channels. This compounding effect doubles your slope steepness unexpectedly, introducing severe phase distortion and gutting your lower midrange presence.
Choose one central location for your signal processing. If you plan to manage crossovers at the amplifier or through an outboard processor, set your head unit filters to “Through,” “Off,” or “Flat.”
Calibrating Analog Dials vs. Software DSP Interfaces
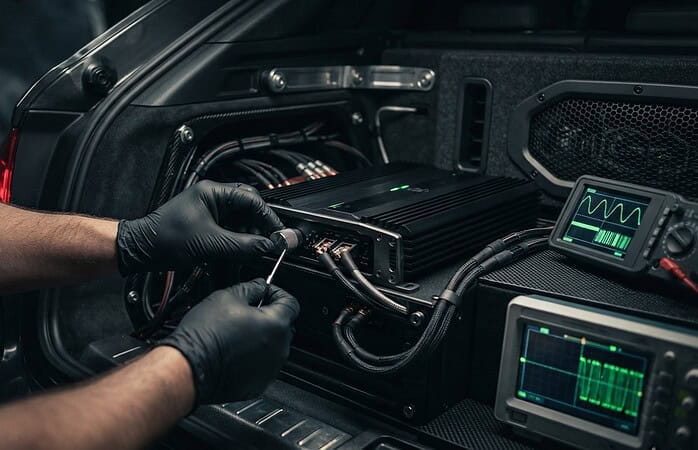
The painted tick marks on analog amplifier end caps are rough approximations, not precision laboratory indicators. An analog dial labeled from 50 Hz to 250 Hz rarely sits at exactly 80 Hz when pointed straight up. To set an analog filter accurately, play an 80 Hz sine wave tone through the system and use a digital multimeter or oscilloscope on the speaker outputs. Rotate the potentiometer until you measure a 3 dB voltage drop, which marks the true electrical cutoff.
Digital sound processors eliminate this mechanical guesswork entirely. With modern DSP software interfaces, you enter exact target numerical frequencies and select specific filter curves with a single click.
Listening Tests, Phase Checks, and Staging Integration
Once you set your initial baselines, sit in the driver’s seat and play familiar acoustic recordings featuring clean acoustic kick drums and upright bass. Listen closely to the front soundstage. Does the low bass sound like it originates up front on the dashboard, or can you clearly pinpoint your subwoofer in the trunk? If the bass feels disconnected, toggle the subwoofer phase switch from 0 to 180 degrees. Flipping electrical polarity often snaps the low end right onto the front hood.
Listen for hollow dead zones or harsh, nasal peaks around the 80 Hz transition point between your sub and door speakers. If you want absolute acoustic symmetry tailored specifically to your vehicle’s interior reflections, connect with Music In Motion for precision multi-channel audio calibration and custom system commissioning.
Bring Concert-Grade Clarity to Every Drive
Dialling in your audio filters bridges the gap between simply installing aftermarket hardware and truly unlocking immersive sound. With these car audio crossover settings explained, you now possess the practical knowledge to protect delicate tweeters, isolate punchy midbass, and eliminate destructive phase cancellation across your cabin. Aligning precise cutoffs with proper filter slopes ensures every driver operates within its acoustic sweet spot without distortion.
Achieving a cohesive, windshield-level soundstage requires careful balance and reliable integration. Since 1994, our team has applied custom audio craftsmanship, advanced acoustic tuning, and precision vehicle integration to help drivers get the absolute most out of their mobile sound systems. When you’re ready to experience flawless tonal balance without the stress of trial-and-error adjustments, explore professional sound system design with Music In Motion. Let’s build the ultimate soundtrack for your journey ahead.
Frequently Asked Questions
What happens if I set my car audio crossover settings incorrectly?
Incorrect crossover settings lead to distorted playback, reduced volume dynamics, and permanent speaker failure. If a high-pass filter is set too low, bass forces tweeters and small mids beyond their mechanical limits, melting delicate voice coils. Conversely, setting cutoffs too high creates a hollow soundstage with gaping frequency gaps between the subwoofer and front speakers. Having car audio crossover settings explained properly protects your investment and ensures crisp, balanced acoustics.
Can I use both my head unit and amplifier crossover settings at the same time?
No, you should avoid activating crossover filters in both your head unit and amplifier simultaneously. Running cascaded filters creates filter stacking. This alters the intended slope steepness, introduces unexpected phase rotation, and can create severe acoustic dips around the transition frequency. Choose one component to handle signal filtering. If your amplifier or DSP manages cutoffs, set the head unit internal crossover filters to “Through,” “Off,” or “Flat.”
What is the recommended crossover setting for a 12-inch subwoofer?
A low-pass filter setting of 80 Hz with a 24 dB slope serves as the industry standard starting point for a 12-inch subwoofer. This frequency keeps heavy sub-bass in the enclosure while preventing high male vocals and midbass instruments from leaking into the trunk. If your vehicle cabin exhibits boomy acoustic resonance, dial the filter down to 70 Hz or 60 Hz to tighten the punch and blend seamlessly with your front door woofers.
What is the difference between a high-pass filter and a low-pass filter?
A high-pass filter lets high frequencies pass through while attenuating lower bass notes, whereas a low-pass filter allows deep bass through while cutting off higher frequencies. High-pass filters protect smaller midrange drivers and tweeters from mechanical excursion damage caused by deep bass. Low-pass filters prevent subwoofers from attempting to play midrange musical content that their heavy cones cannot articulate cleanly.
How do I know if my car speakers have passive or active crossovers?
Check the physical wiring between your amplifier and speakers to determine your crossover style. If your amplifier channels connect to small plastic boxes before splitting out to woofers and tweeters, you have passive crossovers. In active setups, every single driver runs its own dedicated wire directly to an independent amplifier channel, with all frequency dividing handled digitally through a DSP or analog controls on the amplifier before power amplification.
Why do my tweeters sound harsh or crackle at high volume levels?
Harshness or crackling usually indicates that your tweeters are receiving frequencies below their safe mechanical threshold or your amplifier is clipping. When low-frequency energy reaches a tweeter voice coil, rapid physical excursion causes distortion and overheating. Reviewing your car audio crossover settings explained in your equipment manual helps ensure your high-pass filter sits at or above 3,500 Hz with a sufficiently steep slope to block unwanted midrange energy.
Is a subsonic filter necessary for sealed subwoofer enclosures?
Subsonic filters are generally unnecessary for sealed subwoofer enclosures because the trapped air inside acts as an acoustic spring. This internal air pressure naturally cushions the subwoofer cone, preventing destructive over-excursion at ultra-low frequencies. However, engaging a subsonic filter around 20 Hz on high-powered sealed systems can still help conserve amplifier wattage by eliminating inaudible infrasonic frequencies that draw immense electrical current without producing useful sound.