
What if the fix for fading bass isn’t a bigger alternator or another battery? If your amplifier changes performance when the music gets loud, it’s natural to suspect the charging system. But the cause could be voltage lost through a weak connection, undersized wiring, a grounding issue, or a system that can’t keep up. Knowing how to prevent voltage drop in car audio starts with checking the entire power path, not guessing at parts.
Voltage drop under load can look like a charging problem, but the two aren’t always the same. Replacing components before identifying the cause may leave the symptoms unchanged. A careful diagnosis helps you focus on the right fix and protect your audio system.
This guide explains what voltage drop means, how to spot it while your system plays, and how to approach safe, logical checks of wiring, connections, the battery, and alternator. It also covers why upgrades such as heavier wiring or additional power components aren’t universal solutions, and when a qualified installer can help uncover wiring, grounding, or integration problems. The goal is reliable performance, not more parts for their own sake.
Key Takeaways
- Learn how to prevent voltage drop in car audio by finding where power is being lost before choosing a fix.
- Use a safe, ordered inspection and multimeter checks to gather useful clues without guessing at the cause.
- Match symptoms and test findings to likely issues such as damaged wiring, weak connections, poor grounds, or charging-system concerns.
- Support system reliability with secure connections, suitable cable routing, and correctly placed fuse protection.
- Know when persistent power problems call for a qualified installer to assess the audio system as a whole.
What Voltage Drop in Car Audio Means, and Why It Hurts Performance
Bass hits, the amplifier cuts out, or the lights dim when the volume rises. These symptoms can point to a power-delivery problem, but they don’t prove that the battery, alternator, or amplifier has failed. The first step in learning how to prevent voltage drop in car audio is understanding what the measurement describes and where the loss occurs.
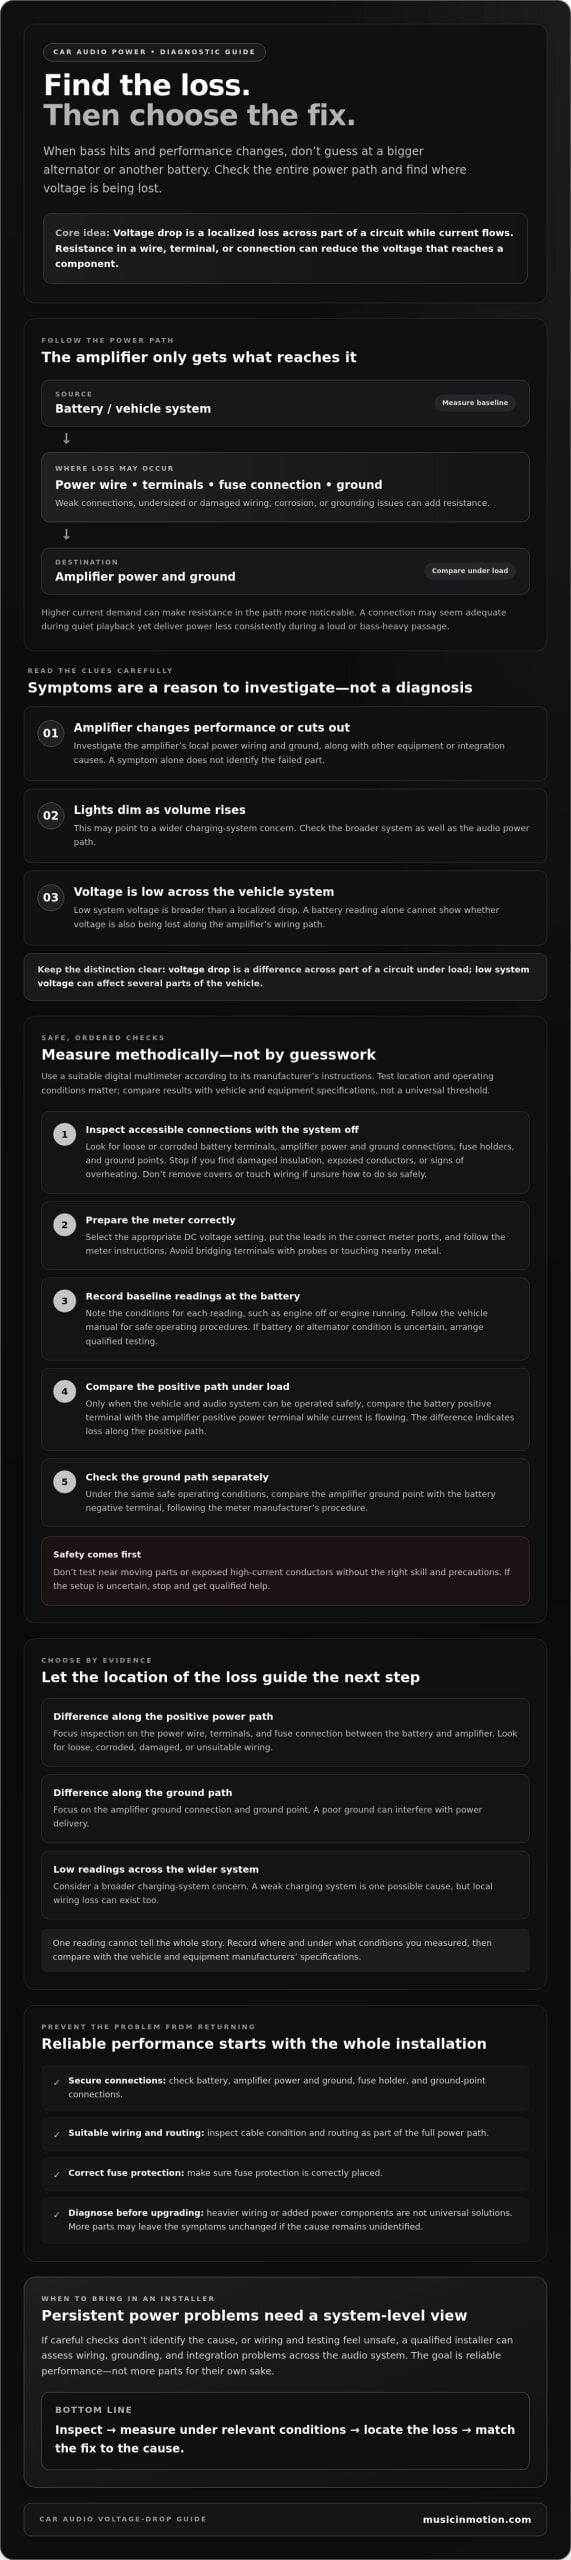
Voltage drop is the loss of electrical potential across part of a circuit while current flows through it. Resistance in a wire, terminal, or connection can use up some of the available voltage before it reaches a component. The Voltage drop reference explains the basic principle: current moving through resistance produces a difference in voltage across that part of the circuit.
Voltage drop versus low system voltage
These terms are related, but they describe different clues. Voltage drop is a localized loss across part of a circuit under load. For example, the vehicle’s electrical system may have one voltage reading while resistance in the amplifier’s power or ground path reduces the voltage reaching it.
Low system voltage is a broader condition that can affect several parts of the vehicle, not just the audio equipment. A weak charging system may be one possible cause, but a single reading at the battery won’t show whether the amplifier’s wiring path is also losing voltage. Test location and operating conditions matter. Assess readings under relevant conditions and compare them with the vehicle and equipment manufacturers’ specifications, rather than relying on a universal threshold.
Why amplifiers reveal weak power connections
An amplifier draws more current when it’s asked to deliver more power. Resistance at a cable, terminal, fuse connection, or ground can become more noticeable under that heavier load. A connection that seems adequate during quiet playback may not deliver power as consistently during a loud or bass-heavy passage. The result can be a change in amplifier performance, cutouts, or dimming lights.
That doesn’t mean every symptom has the same cause. Dimming lights may point to a wider charging-system concern, while an amplifier issue may involve its local wiring or ground. A cutout could also have another equipment or integration cause. Treat symptoms as a reason to investigate, not as a diagnosis. Checking where voltage is lost under load helps distinguish a localized connection problem from low voltage affecting the wider vehicle system, so you can target the next step.
How to Test for Car Audio Voltage Drop Safely
A useful test compares voltage at two points in a circuit while current is flowing. Resistance in the path creates the difference, as described by Ohm’s law. To learn how to prevent voltage drop in car audio, start with what you can inspect safely, then measure methodically. Don’t rely on one reading or assume a universal pass-or-fail voltage. Operating conditions and vehicle and equipment specifications matter.
- Inspect accessible connections with the system off. Look for loose or corroded battery terminals, amplifier power and ground connections, fuse holders, and ground points. Don’t remove covers or touch wiring if you’re unsure how to do so safely. Stop if you find damaged insulation, exposed conductors, or signs of overheating.
- Set up a suitable digital multimeter. Select the appropriate DC voltage setting and use the meter only as its manufacturer instructs. Check that the leads are in the correct meter ports. Avoid allowing probes to bridge terminals or contact nearby metal.
- Record baseline system readings. Measure at the battery under clearly stated conditions, such as engine off and engine running, and record those conditions alongside each result. Follow the vehicle manual for safe operating procedures. If the battery or alternator condition is uncertain, arrange qualified testing rather than relying on these readings alone.
- Check the positive power path under load. Only if the vehicle and audio system can be operated safely, follow the meter instructions to compare voltage at the battery’s positive terminal with voltage at the amplifier’s positive power terminal while the system is drawing current. The difference indicates loss along the positive path. Don’t test near moving parts or exposed high-current conductors without the right skill and precautions.
- Check the ground path separately. Under the same safe operating conditions, compare the amplifier’s ground point with the battery’s negative terminal, following the meter manufacturer’s procedure. This helps distinguish loss in the ground path from loss along the positive cable.
- Record and compare the measurements. Log the test points, engine state, audio load, and readings for both paths. Compare results with relevant vehicle and equipment specifications. If testing under load requires unsafe access or handling, stop and have a qualified installer assess the system.
Keep the vehicle secure and your attention on the test. If you’d rather have an experienced team inspect the system’s wiring and integration, explore professional car audio installations.
Which Car Audio Voltage-Drop Fix Fits the Actual Cause?
A voltage reading is most useful when it points to a specific part of the power path. Match your observations with the test results before buying components. A larger cable won’t repair a corroded terminal, and a new battery won’t correct resistance in an amplifier’s ground connection.
Use the table as a guide, not a final diagnosis. Confirm the suspected cause and compare measurements with vehicle and equipment specifications before deciding on a repair.
| Observed evidence | Likely circuit area | Next check | Suitable repair category |
|---|---|---|---|
| Visible corrosion, looseness, or heat damage at a connection | Battery terminal, fuse holder, or amplifier connection | Have the connection and nearby cable inspected for damage and secure termination. | Clean or repair the connection, or replace damaged parts as appropriate. |
| Voltage loss along the positive path, with cable damage or a mismatch to the system’s requirements | Power cable or its terminations | Check cable condition, sizing, routing, and the equipment manufacturer’s requirements. | Repair damaged wiring or install appropriately sized, protected wiring. |
| Voltage loss on the ground path, or an insecure ground point | Amplifier ground connection and return path | Inspect the termination and confirm the ground path is suitable for the installation. | Repair or rework the ground connection and path. |
| Low readings affecting the wider vehicle system, or battery and charging performance concerns | Battery or charging system | Arrange proper battery and charging-system testing. | Repair or replace a component only if testing confirms it’s faulty or inadequate. |
When wiring or grounding needs attention
Damaged insulation, unsuitable cable, poor routing, or a loose termination can add resistance and limit power delivery. A ground connection also needs secure, clean contact and a properly planned path. Repairing the affected wiring or termination may address the problem without changing the battery or alternator. If cable sizing, routing, or circuit protection is uncertain, have a qualified installer assess it before making changes.
When the battery or alternator may be involved
A weak battery or charging-system fault can contribute to low system voltage, but that’s different from voltage being lost across an audio circuit. Replacing the battery alone won’t reliably prevent voltage drop if the real issue is a poor connection, inadequate wiring, or a ground fault. Have the battery and charging system tested by a technician or an on-site service like VA Mobile Auto Mechanic, then use the results to guide any replacement or upgrade.
Complex systems can involve several power and integration considerations at once. For an example of how installation design shapes an audio system, see custom car audio fabrication. The right fix for how to prevent voltage drop in car audio addresses the confirmed cause, not simply the largest component.
A Step-by-Step Plan to Prevent Voltage Drop from Returning
A repair isn’t confirmed until the system performs reliably under comparable conditions. Keep a simple record so you can tell whether the fix worked and give an installer useful context if the problem returns. This is a practical way to approach how to prevent voltage drop in car audio without replacing parts by guesswork.
- Document the symptoms. Note when the issue occurs, such as during bass-heavy music, at idle, or after the system has been playing for a while. Record what changes, including cutouts, dimming lights, or altered amplifier performance.
- Inspect accessible connections. With the system off, look for loose or corroded terminals, damaged wiring, and insecure ground connections. Stop if you see exposed conductors or signs of overheating.
- Measure and save the baseline. Record readings with the test points, engine state, and audio operating conditions clearly noted. Use vehicle and equipment specifications to interpret results, rather than treating a reading as meaningful without context.
- Repair the confirmed cause. Address a faulty connection, damaged cable, or ground-path issue directly. Make sure wiring is suitable for the system, properly routed and secured, and protected from damage. Use appropriate fuse protection as directed by the vehicle and equipment manufacturers. Never bypass a fuse or substitute an unsuitable protective device.
- Retest under comparable conditions. Repeat the measurements using the same test points and similar operating conditions. If the system has changed, note the new setup so you can distinguish the effect of the repair from the effect of added equipment.
Keep the installation reliable as the system changes
Save a record of installed equipment, wiring changes, and baseline readings. Adding an amplifier or other high-current equipment can change electrical demand, so a setup that worked before may need reassessment. Before expanding an existing installation, review the system as a whole instead of assuming its current wiring and power delivery are still suitable. For broader planning, see this car audio upgrade guide.
Know when DIY testing should stop
Persistent abnormal readings or symptoms deserve a closer look from a qualified installer. Stop testing if wiring is damaged, connections are uncertain, a cable or terminal is overheating, or a fuse fails repeatedly. Don’t keep replacing fuses or increase their rating to keep the system running. A professional can assess the installation and help determine whether the issue calls for a repair, an integration review, or a reassessment of the system’s power requirements.
If you’re planning an upgrade or want help with a custom installation, explore professional car audio upgrades and installations.
When Professional Car Audio Installation Can Solve Persistent Voltage Drop
If power symptoms continue after basic checks, have the entire installation reviewed. A qualified car audio installer can look at how the amplifier, wiring, grounds, circuit protection, and vehicle electrical system work together. That broader view matters because the visible symptom may appear at the amplifier while the underlying issue lies elsewhere in the power path or in how the equipment has been integrated.
A professional assessment doesn’t automatically mean replacing a battery, alternator, or amplifier. Diagnosis should come first. A repair or upgrade recommendation should be supported by the observed symptoms, relevant measurements, and specifications for the vehicle and installed equipment. That’s a more dependable way to decide how to prevent voltage drop in car audio than swapping components and hoping the problem disappears.
What a professional system assessment should cover
A useful assessment starts with your description of when the problem occurs, then considers the installed equipment and its wiring layout. The installer can review power and ground connections, cable condition and routing, fuse protection, and how the audio components are integrated with the vehicle. Testing should reflect the actual setup and use conditions, with results interpreted against applicable vehicle and equipment specifications.
Ask what findings support the proposed next step. Which part of the system is showing a problem? What measurements or visible evidence point to it? Why is a repair or upgrade appropriate? Clear answers help you understand the plan and distinguish a targeted fix from a parts-only recommendation.
Choose a fix that improves the finished result
Good installation work is about more than adding hardware. The aim is suitable power delivery, secure connections, appropriate protection, and equipment that works together as a complete system. Sometimes the evidence points to correcting an installation issue. In other cases, testing may show that the system’s needs call for a broader change. Let the findings guide that decision, not assumptions about which component is usually to blame.
Music In Motion provides professional car audio upgrades and custom installations, with experience integrating premium electronics and custom audio systems. If voltage-related symptoms persist or you’d like an experienced perspective on your setup, contact Music In Motion to discuss your car audio installation needs. A clear description of the symptoms and any readings you’ve recorded can help start the conversation.
Get Back to Reliable, Consistent Audio
The best way to understand how to prevent voltage drop in car audio is to follow the evidence: note when symptoms occur, inspect connections, and measure the power and ground paths under suitable conditions. Then choose a repair for the confirmed cause and retest the system. A larger battery or alternator isn’t automatically the answer.
If the issue persists, take a system-level view. Wiring, grounds, equipment protection, and integration all play a part in how an audio system performs. Music In Motion provides professional car audio upgrades and custom installations, with experience integrating premium vehicle electronics.
When you contact Music In Motion, share what you’ve noticed and any readings you’ve recorded. Talk with our team about a professional car audio assessment to discuss the next step for your setup. A thoughtful diagnosis and a fix matched to the cause can help your audio system perform more consistently.
Frequently Asked Questions
What causes voltage drop in a car audio system?
Voltage drop usually occurs when resistance in the power or ground path reduces the voltage reaching a component while current is flowing. Possible causes include loose or corroded connections, damaged or unsuitable wiring, and poor grounds. A charging-system concern or high current demand may also contribute to low system voltage. Symptoms alone can’t identify the cause, so check the relevant circuit and compare measurements with vehicle and equipment specifications.
How do I test voltage drop to a car amplifier?
Use a suitable digital multimeter and follow its instructions. With the system off, inspect accessible connections first. If you can operate the setup safely, compare voltage across the amplifier’s positive power path while current is flowing, then check the ground path separately. Record the test points, engine state, and audio conditions. Compare results with vehicle and equipment specifications, not a universal threshold. Stop if testing involves exposed conductors or unsafe access.
Can a bad ground cause voltage drop in car audio?
Yes. A loose, corroded, damaged, or poorly planned ground connection can add resistance and reduce the voltage available to the amplifier under load. A ground-side voltage-drop test can help identify whether the loss is along the return path rather than the positive cable. Inspect connections only when it’s safe, and don’t assume a ground is good just because the amplifier powers on. Have uncertain or damaged wiring checked by a qualified installer.
Will a bigger battery prevent voltage drop in my car audio system?
Not necessarily. A larger or replacement battery won’t fix voltage lost through a corroded terminal, undersized or damaged cable, or poor amplifier ground. It also won’t automatically resolve a charging-system concern. Test the battery and inspect the audio power path before choosing a replacement. The right solution depends on the measured cause and the vehicle and equipment specifications, not simply on battery size or the fact that symptoms appear during loud playback.
Can an upgraded alternator fix car audio voltage drop?
An upgraded alternator may be considered if proper testing shows the charging system can’t meet the electrical demand. It won’t correct resistance in a damaged cable, loose connection, or poor ground, so it isn’t an automatic fix for amplifier voltage drop. Start by checking the circuit and having the battery and charging system assessed. Use those findings, along with the installed equipment’s requirements, to decide whether repair or an upgrade makes sense.
Why do my headlights dim when the bass hits?
Headlights may dim briefly when bass causes the audio system to draw substantial current, particularly if power delivery or the charging system can’t keep voltage stable under that load. But dimming doesn’t identify one faulty component by itself. Wiring, connections, grounds, battery condition, or charging performance may all deserve attention. Note when the dimming happens and have the system checked if it’s pronounced, persistent, or accompanied by other electrical symptoms.
Is voltage drop in car audio dangerous?
A voltage reading alone doesn’t establish a safety hazard, but the underlying cause can matter. Damaged insulation, loose high-current connections, overheating, or repeated fuse failures are reasons to stop using the system and seek qualified inspection. Don’t bypass a fuse or replace it with an unsuitable rating. If you’re unsure whether testing or continued use is safe, stop and have a qualified installer assess the wiring and connections.