What if your amplifier gain isn’t a volume knob, but a precision dial that determines whether your speakers live or die? We’ve all felt that nagging anxiety after a fresh install, wondering if a single high-volume track will finally push those voice coils past their limit. It’s easy to confuse gain with power, but that mistake often leads to distorted sound and a shortened equipment lifespan. We’re here to help you eliminate the guesswork. By learning how to set amp gains with an oscilloscope, you’ll gain the ability to see your signal in real time, ensuring every watt of power is clean and safe.
We believe that a professional finish is about more than just the hardware; it’s about the precision of the integration. In this guide, we’ll walk you through the exact steps to match your head unit’s output to your amp’s sensitivity using current CTA-2006-D standards. You’ll learn how to identify signal clipping before it causes damage, allowing you to enjoy distortion-free audio at maximum volume while protecting your high-performance investment for years to come. From budget-friendly handheld units to benchtop precision, we’ll show you how to master the visual handshake between your components.
Key Takeaways
- Understand why gain is an input sensitivity adjustment rather than a volume control to prevent catastrophic equipment failure.
- Discover how to identify signal clipping visually, transforming distorted “square waves” back into clean, high-performance sine waves.
- Master the professional method of how to set amp gains with an oscilloscope to achieve a level of precision that standard multimeters cannot match.
- Learn the essential preparation steps, including disconnecting speakers and flattening EQ settings, to ensure a safe and accurate tuning process.
- See how precise signal matching acts as the final, critical step in protecting your custom fabrication investment and maximizing equipment lifespan.
Understanding Amplifier Gain: Why It Is Not a Volume Knob
We often see enthusiasts treat the gain control on an amplifier like a secondary volume knob. This is a dangerous misconception that puts your equipment at risk. In reality, the gain dial is an input sensitivity adjustment. Its only job is to match the amplifier’s input stage to the output voltage of your head unit. When you treat gain as a power throttle, you aren’t actually adding more power; you are simply forcing the amplifier to reach its maximum output sooner in the volume range. This often happens before the amplifier’s power supply can keep up, leading to a clipped signal and catastrophic equipment failure.
To understand the technical side, we have to look at the ratio of signal amplification. What is Amplifier Gain in a car audio context? It is the setting that tells the amplifier how much to multiply the incoming signal from your radio. If your radio sends a weak signal, the gain must be higher. If your radio sends a strong, high-voltage signal, the gain should be lower. Learning how to set amp gains with an oscilloscope is the only way to visualize this relationship and ensure your amplifier stays within its “clean” operating range. Our goal is always to reach the maximum possible output before hitting the ceiling of the power supply.
The Input Sensitivity Handshake
Think of the connection between your head unit and amplifier as a professional handshake. Your source unit sends a specific pre-amp voltage through the RCA cables. Modern high-performance head units often produce 4V or even 5V of output. Because this signal is already strong, the amplifier doesn’t need to work as hard to multiply it. In these cases, we set the gain lower to maintain a high signal-to-noise ratio. If these settings are mismatched, you create a bottleneck. A gain set too high for a high-voltage source results in immediate distortion. A gain set too low for a weak source leaves your system sounding thin and quiet. Using a professional method to find the right balance is a critical step in any custom installation.
The Danger of Over-Gaining
Loudness is not the same as quality. When you “over-gain” a system, the extra volume you hear is actually compressed, distorted sound. This distortion turns smooth audio waves into jagged “square waves” that deliver a constant, DC-like current to your speakers. This current generates massive amounts of heat. We’ve seen this heat melt voice coils and trigger the amplifier’s thermal protection modes. Beyond the physical damage, improper gain settings are a leading cause of system failure and can void many manufacturer hardware warranties. This is why we emphasize how to set amp gains with an oscilloscope; it allows us to see the exact moment the signal breaks down, protecting your investment while delivering the professional-grade sound you expect.
The Science of Signal Matching: Clipping and Distortion
We believe every great audio system starts with a clean signal. When you look at an audio wave on a screen, it should be a graceful, rounded sine wave. Clipping occurs when you ask an amplifier to provide more voltage than its internal power supply can deliver. The peaks of the wave hit a “ceiling,” and the bottoms hit a “floor.” This flattens the wave, turning it into a square shape. These square waves are incredibly dangerous for your speakers. Instead of a smooth push and pull, they deliver pulses of DC-like current. This current keeps the voice coil stationary while generating massive heat. In many cases, this results in a burnt smell and a dead subwoofer. Learning how to set amp gains with an oscilloscope allows you to stop this process before it starts. You see the distortion before you hear the damage.
Modern Class D amplifiers often handle this stress differently than older designs. Some utilize “soft clipping” circuits that try to round off the jagged edges of a square wave. While this sounds less harsh to the ear, it still generates heat and robs your music of its natural dynamics. Hard clipping is much more aggressive and can destroy a high-performance tweeter in seconds. Beyond the hardware risk, distortion fundamentally changes your internal experience. Clean sound is relaxing and immersive. Distorted sound causes “listener fatigue,” that subtle feeling of wanting to turn the music down after only a few minutes. We prioritize signal integrity because we want you to enjoy your music for hours, not just minutes.
Total Harmonic Distortion (THD) Explained
Total Harmonic Distortion (THD) is a measurement of how much an amplifier changes the signal it receives. Professional amplifiers are designed to keep this number extremely low, often under 1% even at full power. When you perform a car audio upgrade for stock stereo, managing THD becomes your top priority. The threshold of human hearing for distortion varies, but most people begin to notice a loss of clarity once THD climbs above 1% to 3%. We focus on these minute details to ensure your daily commute feels like a front-row seat at a concert.
Head Unit Distortion Points
Before you even touch your amplifier, you must find the limits of your source unit. Most factory and aftermarket radios begin to distort long before they reach “max” on the volume display. In our experience, the signal usually breaks up between 75% and 90% of the total volume range. If your radio is sending a dirty signal, your amplifier will simply make that distortion louder. This is why a Step-by-Step Guide to gain setting always begins with the head unit. Learning how to set amp gains with an oscilloscope ensures that your head unit and amplifier are perfectly synchronized.
You must also be wary of “Bass Boost” or “Loudness” buttons. These features often introduce massive amounts of clipping into the signal chain. We recommend keeping these settings flat to preserve the integrity of your music. If you want a system that sounds as good as it looks, our experts at Music In Motion can help you dial in every component for peak performance.
Essential Tools for Tuning: Multimeters vs. Oscilloscopes
We believe in using the right tool for the job. While many DIY enthusiasts reach for a Digital Multimeter (DMM), we prefer the precision of an oscilloscope. A DMM is great for basic troubleshooting and setting target voltages using Ohm’s Law. It’s an accessible starting point for those just entering the hobby. However, it only provides a numerical average of the signal. It can’t tell you if that voltage is clean or filled with harmonic distortion. Specialized tools like the SMD DD-1 are also popular for their foolproof indicators, but they still don’t provide the granular detail of a real-time wave display. We always warn against setting gains by ear. Modern high-output systems are far too powerful to rely on human hearing. Most people can’t detect clipping until it reaches a level that is already causing thermal damage to the voice coils.
The real magic happens when you see the signal. Understanding how to set amp gains with an oscilloscope means you aren’t just guessing based on a formula. You’re looking at the actual behavior of your amplifier’s output. This visual confirmation is why we consider it the gold standard for every custom project we handle. It ensures that the “handshake” we discussed earlier is perfect.
Why Visuals Beat Math
A multimeter might show you exactly 20 volts, which matches your calculated target. But that 20 volts could be a clean sine wave or a jagged, square mess. An oscilloscope identifies signal noise and power supply ripple that a meter simply ignores. Seeing the difference between a smooth peak and a flat-topped wave gives you the confidence to push your system to its true limit. This visual data is essential when we work on high-end custom fabrication projects where every component must perform perfectly. For a deep dive into the technicalities of wave shapes and gain overlap, Rockford Fosgate’s guide to setting gains offers a wealth of data on how these signals behave under load.
Choosing the Right Test Tones
Your results are only as good as your test signal. We use a 1kHz tone at 0dB for mid-range and high-frequency speakers because it’s the industry standard for clarity. For subwoofers, we switch to 40Hz or 50Hz tones. These lower frequencies allow us to account for gain overlap, ensuring your bass has the impact you want without overheating the coils. Don’t use YouTube or low-quality streaming apps for this. Those platforms often use compression that adds artifacts to the tone, which will ruin your calibration. We always use high-quality, uncompressed files to ensure our starting point is perfect. This attention to detail is what separates a standard install from a professional-grade audio experience.
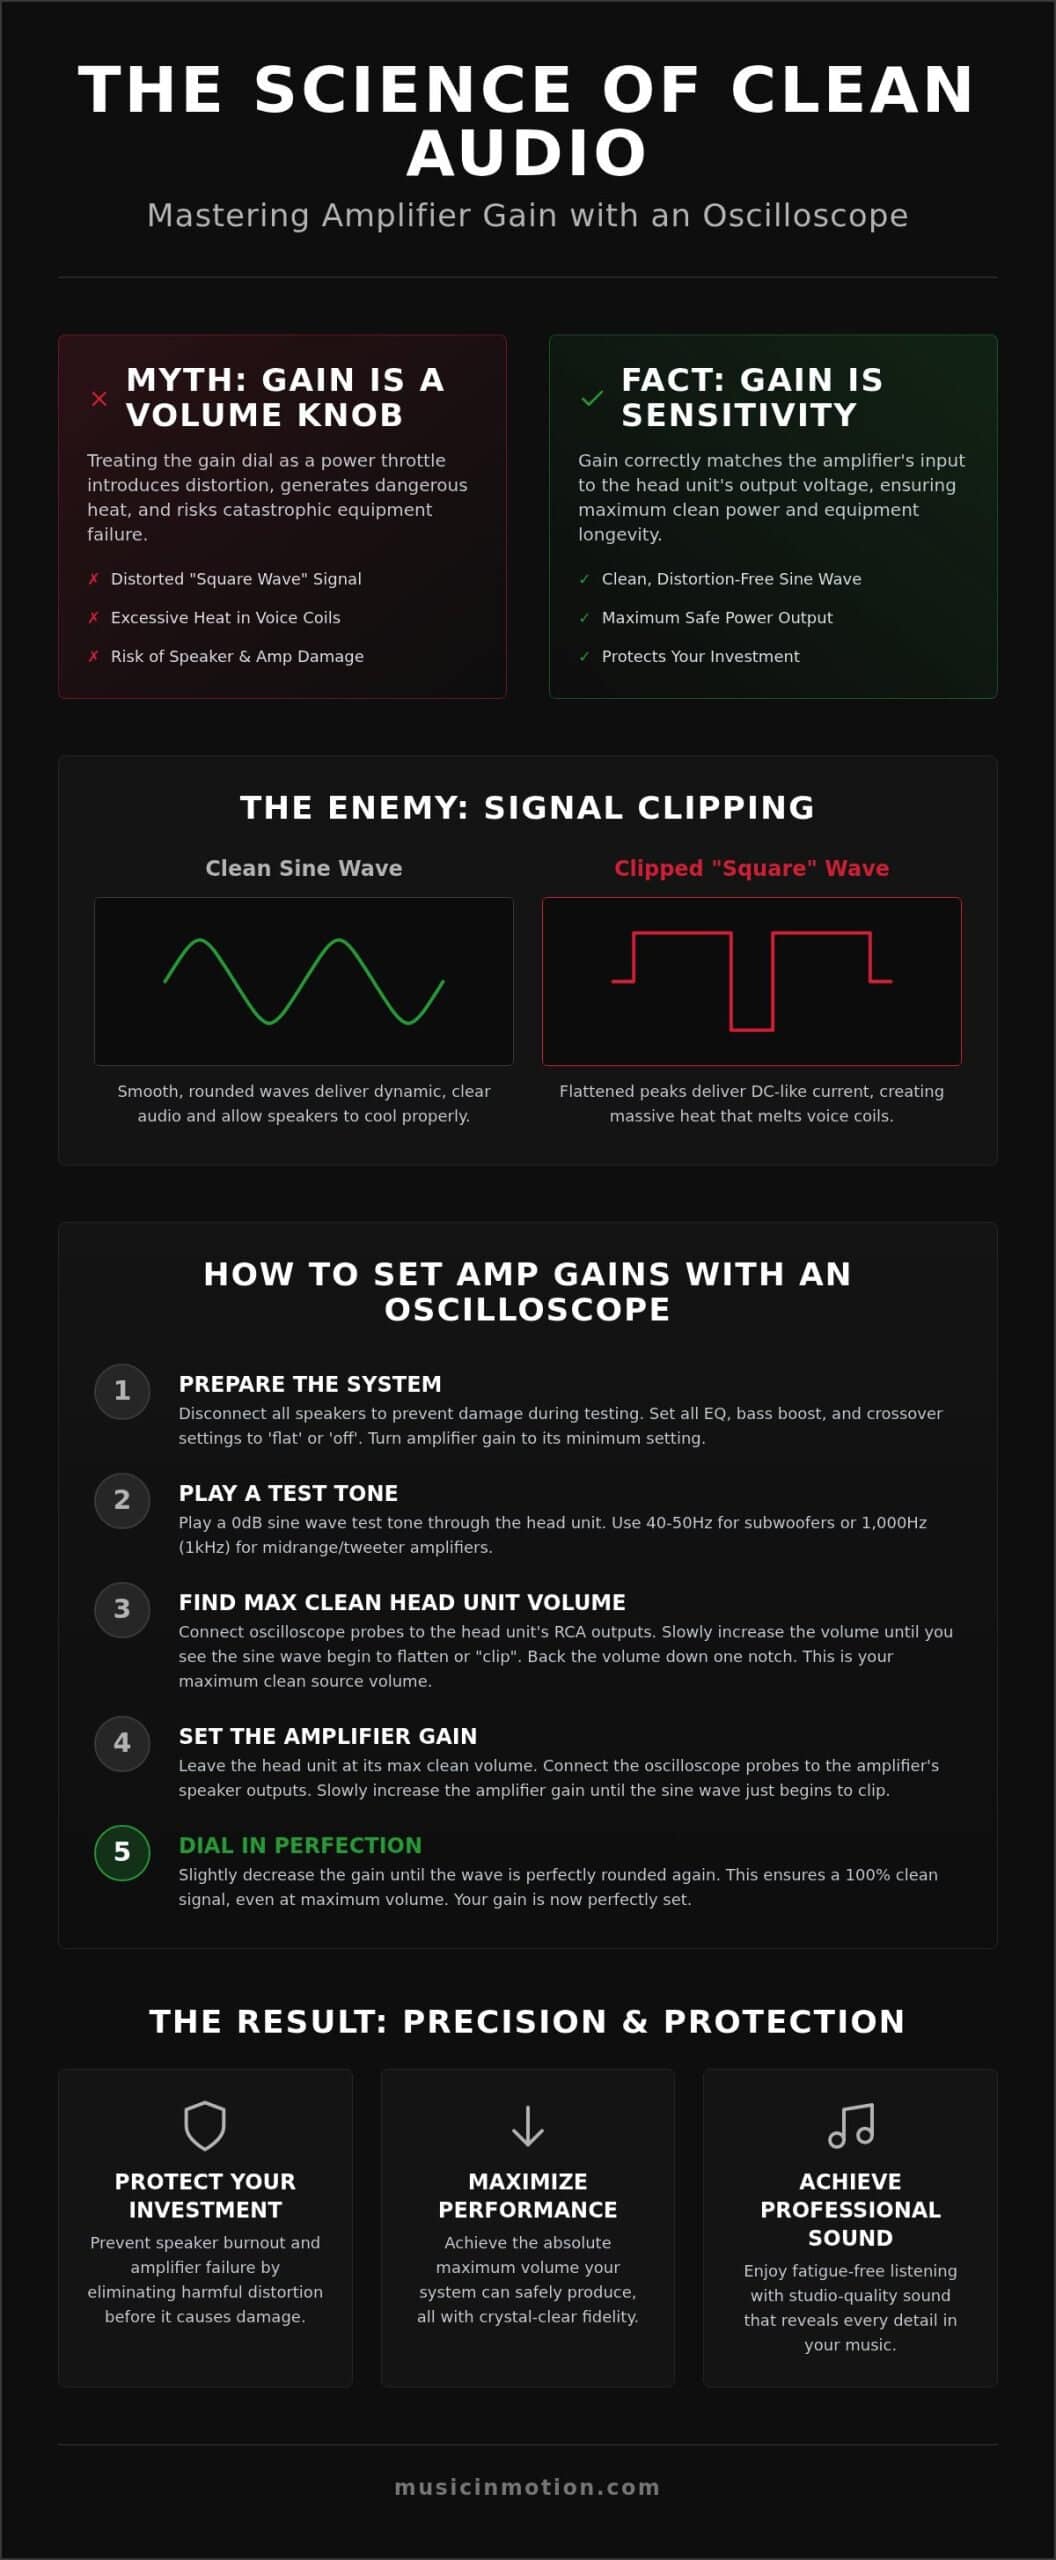
Step-by-Step Guide: How to Set Amp Gains with an Oscilloscope
We’ve covered the science and the tools. Now, let’s walk through the actual process. This is where precision meets performance. Before you start, disconnect all speakers from the amplifier. This is a critical safety step that many guides overlook. High-voltage test tones can easily destroy a speaker before you even realize the signal is clipping. Once the load is removed, you can safely push the amplifier to its limits without risking your investment.
Next, we turn our attention to the head unit. We must ensure every enhancement is disabled. Turn off the EQ, Bass Boost, and any “Loudness” settings. These features introduce artificial peaks that will skew your results. After the signal is flat, set the head unit to its maximum clean volume. As we discussed in previous sections, this is typically around 75% to 80% of the total range. This provides a clean foundation for the amplifier to build upon. Connect your oscilloscope probes directly to the amplifier’s speaker terminals and ensure your test tone is playing. Slowly rotate the gain dial clockwise. You’ll see the sine wave grow taller on the screen. The moment the rounded peaks begin to flatten into a horizontal line, you’ve reached the ceiling. This is how to set amp gains with an oscilloscope with professional accuracy.
Interpreting the Waveform
You’ll need to adjust the voltage and time scales on your scope to keep the wave clearly visible. Watch the very top and bottom of the curve. If the peak looks like it was sliced off with a knife, you are in the danger zone. We always recommend backing the gain off just a tiny bit once you find that point. This creates a small safety margin for tracks that might be recorded at higher levels than your test tone. It’s better to leave a few watts on the table than to invite distortion into your daily drive.
Fine-Tuning for Different Speaker Types
Tuning for custom subwoofer enclosures requires a different approach than tuning for door speakers. Low frequencies move a lot of air and generate more heat. We often use a slightly more conservative setting for subwoofers to account for long listening sessions. If you have a multi-amp setup, balance the gains so the sub-bass doesn’t drown out your component sets. Finally, re-check your settings after the system has been running for 15 minutes. Amplifiers can behave differently once they reach their stable operating temperature. If you want a system that is perfectly balanced and safe, our team at Music In Motion is ready to help you finish your build.
Beyond the Knob: Professional Integration for Maximum Performance
We view gain setting as the final, critical step in a larger creative journey. While knowing how to set amp gains with an oscilloscope provides the foundation for a safe system; the best results come from looking at the entire signal chain. Proper gain staging is what separates a car that is simply loud from one that is truly musical. It involves balancing every component so that no single part of the system is working harder than it needs to. This holistic approach is especially important when we integrate high-output equipment into complex car audio fabrication projects. When every stage of the signal is optimized, you experience effortless dynamics and a whisper-quiet noise floor.
Complex vehicle systems with multiple amplifiers and active crossovers require a higher level of scrutiny. If you are running a 3-way active front stage plus a dedicated subwoofer array, the interaction between gains becomes much more delicate. In these scenarios, a small error in one amplifier can pollute the entire acoustic environment. We often find that seeking professional help for these advanced configurations saves time and protects your investment. We prioritize the safety of your electronics as much as the impact of the sound.
The Role of the DSP in 2026
Modern audio integration has evolved far beyond the simple analog dial. In 2026, Digital Signal Processors (DSPs) serve as the brain of the high-performance system. These processors allow us to manage input and output gains independently via sophisticated software. A DSP can take a messy, equalized signal from a factory head unit and clean it before it ever reaches your amplifiers. Many current processors even feature built-in software clipping indicators. These tools provide real-time monitoring that complements the data we gather when we show you how to set amp gains with an oscilloscope. This digital precision ensures that even the most complex factory integration sounds like a purpose-built studio.
The Music In Motion Philosophy
Our focus is always on the finished result. We believe that a successful installation is one that delivers reliable, breathtaking sound every single time you turn the key. We don’t just sell hardware; we provide a complete sensory experience. Our custom installations prioritize safety and functionality, ensuring that your vehicle’s electrical system remains healthy while your audio performs at its peak. We take pride in our growth and our ability to handle everything from standard utility upgrades to boundary-pushing custom builds. We invite you to take a collaborative approach to your next project. Whether you are tuning a motorcycle, a boat, or a daily driver, we have the specialized knowledge to enhance your life behind the wheel, much like how N2 Speed optimizes vehicle performance through expert engine calibration.
Unlock the Full Potential of Your Sound System
Precision is the bridge between a standard audio setup and a truly immersive listening experience. We’ve explored how treating gain as a sensitivity handshake rather than a power throttle protects your voice coils and ensures every note remains crystal clear. By mastering how to set amp gains with an oscilloscope, you move beyond the limitations of math and hearing to see the actual health of your signal. This visual certainty is the only way to guarantee 100% equipment safety while reaching the maximum clean output your system can handle.
Since 1994, we’ve focused on delivering finished results that transform your daily drive into a front-row concert. As a national authority in high-performance mobile electronics, we specialize in premium vehicle and marine integration that stands the test of time. Whether you’re building a custom subwoofer enclosure or a complex multi-amp marine system, professional tuning is the final step in your fabrication journey. Ready for a professional sound upgrade? Explore our Custom Car Audio Services and let us help you dial in the perfect sound. Your high-performance investment deserves nothing less than perfection.
Frequently Asked Questions
Can I set my amplifier gain without a multimeter or oscilloscope?
You can technically set gains by ear, but we don’t recommend it for high-performance systems. Most listeners can’t detect signal clipping until it reaches roughly 10% distortion, which is often enough to cause permanent thermal damage to your voice coils. Learning how to set amp gains with an oscilloscope provides the visual proof you need to ensure your signal is 100% clean before it ever reaches your speakers.
What happens if I set my gain too low?
Setting your gain too low results in a system that sounds quiet and lacks dynamic impact. You’ll find yourself turning the head unit volume up to its maximum range just to hear the music, which often introduces distortion from the source unit itself. Proper gain matching ensures you have plenty of “headroom,” allowing the system to sound full and powerful even at moderate volume levels.
Is gain the same thing as the Bass Boost button on my amp?
No, gain and Bass Boost serve completely different purposes. Gain is an input sensitivity adjustment used to match your radio’s output to the amplifier’s input. Bass Boost is a narrow-band equalizer that artificially pumps up a specific frequency, usually around 45Hz. Engaging Bass Boost after setting your gains will almost always cause the amplifier to clip, leading to distorted sound and potential speaker failure.
Does changing my head unit mean I have to reset my amplifier gains?
Yes, any change to your source unit requires a complete recalibration of your amplifier gains. Every head unit has a unique pre-amp output voltage, typically ranging from 2V to 5V. If you replace a low-voltage factory radio with a high-voltage aftermarket unit, your current gain settings will be far too sensitive. This mismatch leads to immediate clipping and puts your entire audio investment at risk.
What frequency test tone should I use for my subwoofers?
We recommend using a 40Hz or 50Hz test tone for subwoofer applications. These frequencies represent the heart of the bass spectrum and are ideal for identifying the exact point where an amplifier’s power supply hits its limit. When you use these uncompressed tones to learn how to set amp gains with an oscilloscope, you can dial in the perfect balance of deep bass response and equipment safety.
Why does my amp go into protect mode even after I set the gain?
Protect mode is often triggered by issues beyond just gain settings, such as low battery voltage, a poor ground connection, or a speaker impedance mismatch. If your amplifier is starving for current, it may shut down even if the signal is clean. We always check the entire electrical path to ensure the amplifier has the stable 14.4V foundation it needs to perform at its rated RMS power.
Can high gain settings cause electrical system strain or dimming lights?
High gain settings force an amplifier to reach its maximum current draw much earlier in the volume range. If your gain is set too high, the amplifier will constantly pull massive amounts of amperage that can overwhelm a factory alternator. This excessive draw leads to voltage drops, which you’ll often see as dimming headlights or a fluttering dashboard during heavy bass notes.
Should I set my gain with the engine running or off?
We always suggest setting your gains with the engine running. Your vehicle’s electrical system typically operates at 14.4 volts while the alternator is charging, but it drops to 12.6 volts when the engine is off. Since amplifiers produce more power at higher voltages, tuning with the engine running ensures your settings are accurate for real-world driving conditions where you’ll actually be enjoying your music.