You’ve spent weeks planning your system, but the moment you hit the gas, a high-pitched whistle drowns out the vocals. It’s a sinking feeling when a high-end investment sounds cheap because of a persistent, engine-synced buzz. We understand the frustration of technical terms like ground loops and the fear that a noise issue might damage your expensive components. Since 1994, our team has focused on delivering finished results that prioritize clarity, and we know that troubleshooting alternator whine in car audio is a challenge every enthusiast eventually faces. You deserve a listening experience that’s free from distractions.
This guide is your professional roadmap to a silent background. We’ll show you how to identify, isolate, and eliminate that annoying noise using our proven diagnostic framework. We’ll cover everything from simple ground checks to advanced cable management for high-output systems. By the end of this article, you’ll have the confidence to pinpoint the specific cause of the interference and know exactly how to fix it. We’re moving past quick fixes to provide a permanent solution for your vehicle’s audio health.
Key Takeaways
- Use the “RPM Test” to confirm you’re troubleshooting alternator whine in car audio rather than dealing with standard system hiss or white noise.
- Learn why a ground loop occurs when components follow different electrical paths, causing interference to bleed into your music.
- Follow our systematic isolation framework to determine if the noise starts at your head unit or your amplifier before you start replacing parts.
- Discover the power of “The Big 3” upgrade and professional-grade grounding techniques to eliminate the potential differences that cause whine.
- Understand how custom fabrication and high-output alternators provide the stable electrical foundation needed for advanced, high-performance systems.
What is Alternator Whine? Identifying the Engine-Synced Symptom
Alternator whine is a specific type of electrical interference that occurs when the vehicle’s charging system bleeds into your audio signal. We often hear customers describe it as a high-pitched siren or a whistle that mimics the engine’s movement. It’s a common hurdle when troubleshooting alternator whine in car audio, especially in high-performance builds. This noise isn’t just a minor annoyance; it’s a symptom of an electrical path failure that needs a systematic solution. Since 1994, we’ve helped enthusiasts move past these distractions to achieve the pure, finished results they expect from a premium system.
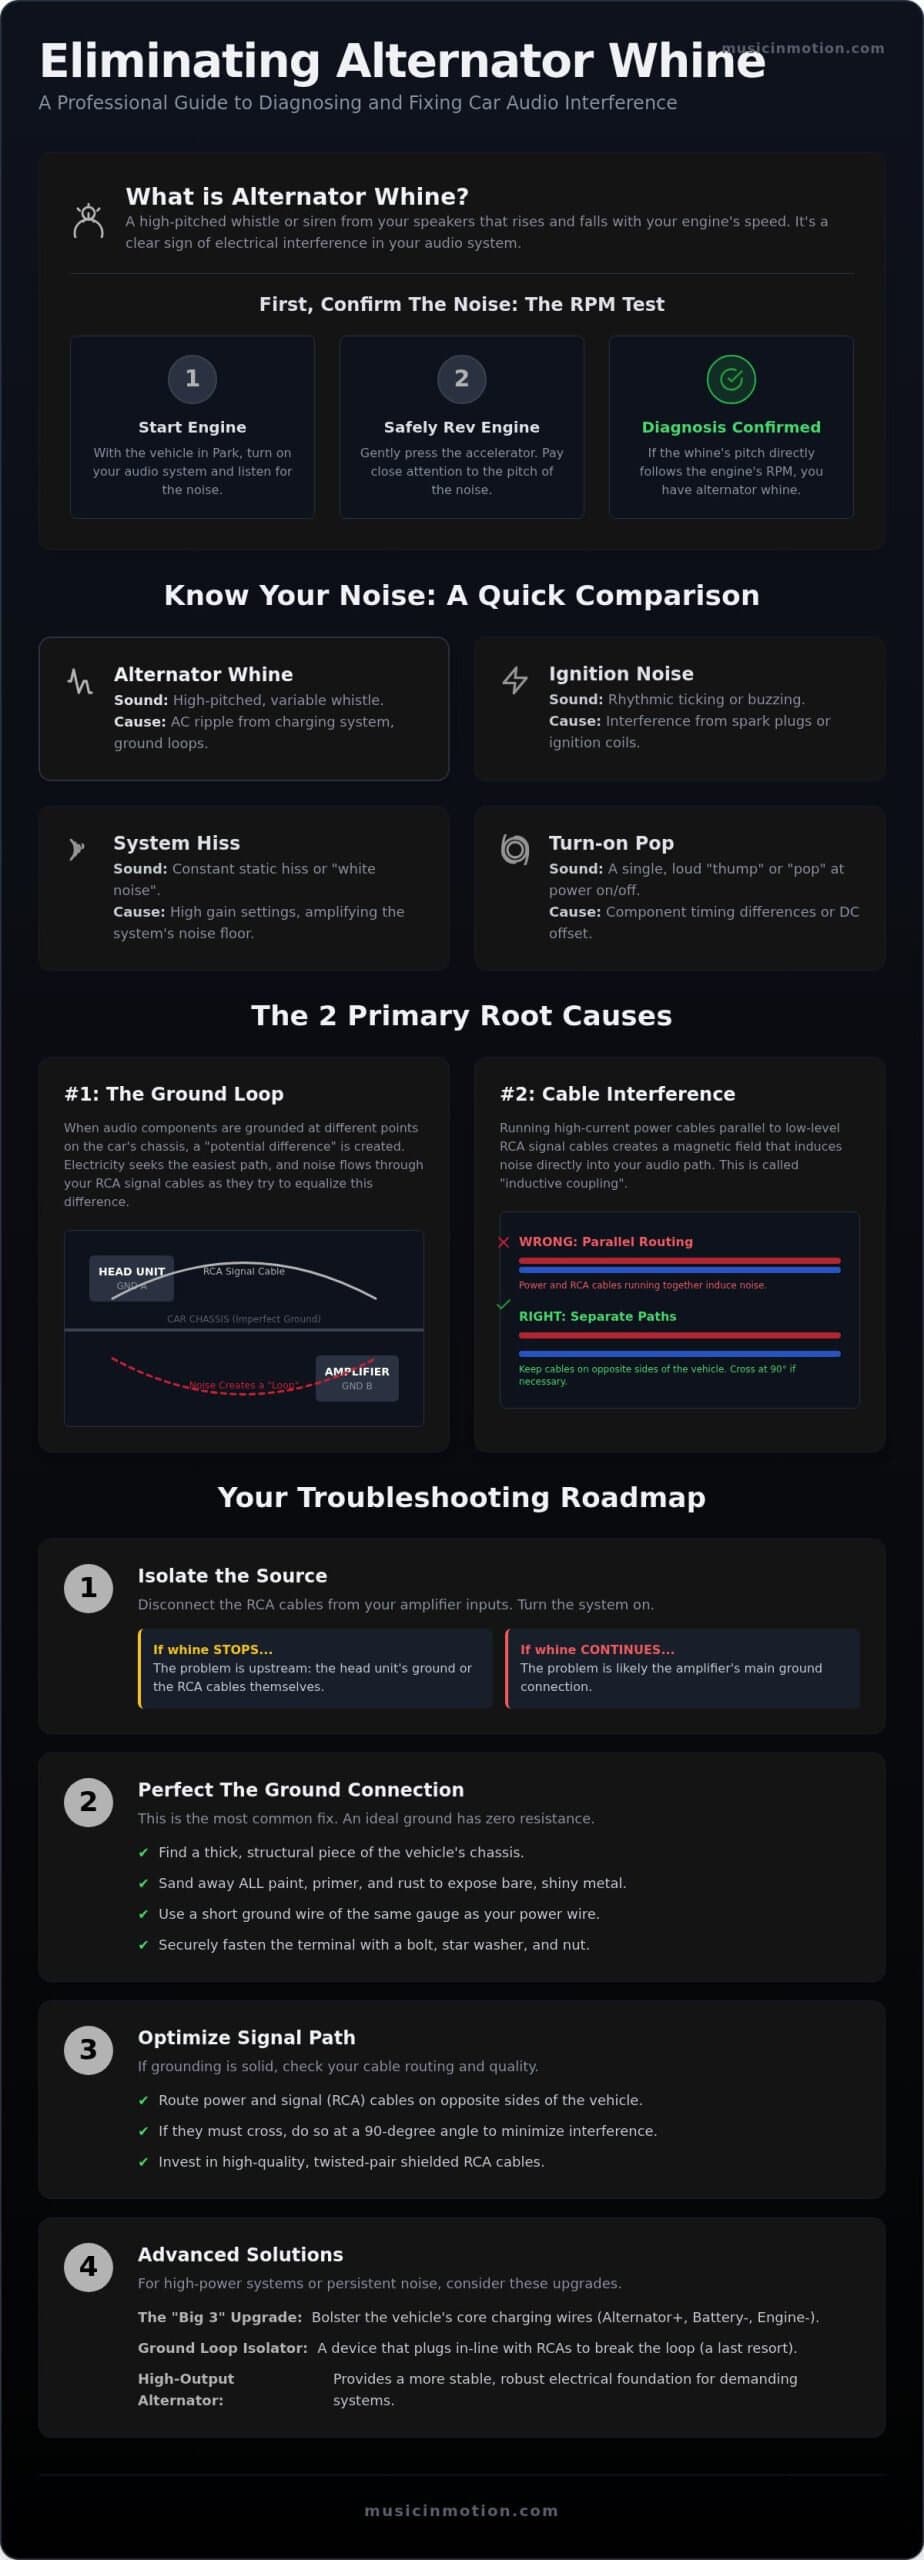
To confirm you’re dealing with this specific issue, we recommend the “RPM Test.” Start your engine and listen to the noise while safely revving the motor in park. If the pitch of the whistle rises and falls in perfect sync with the engine speed, you’ve identified alternator whine. This differs from static or white noise, which remains at a constant frequency regardless of what the engine is doing. High-end audio relies on a low noise floor to deliver wide dynamic range. When a persistent whistle occupies that space, it ruins the emotional impact of the music and makes a sophisticated system feel unrefined.
Alternator Whine vs. Other Noises
Differentiating between various system noises is the first step in our diagnostic framework. Turn-on pops are usually caused by timing issues or DC offset between components. A constant hiss, often called floor noise, typically points to excessive gain settings where the amplifier is boosting its own internal noise. Ignition noise is another common culprit, but it sounds like a rhythmic ticking rather than a whistle. This ticking usually stems from spark plug wires or ignition coils. True alternator whine is melodic and variable, shifting its frequency as the alternator’s internal rotor spins faster.
The Physics of the Whine
Your alternator generates Alternating Current (AC), which is converted to Direct Current (DC) through a component called a diode bridge. No diode bridge is perfectly efficient; small amounts of “AC ripple” can leak into the DC electrical system. In a factory setup, this ripple is rarely audible. However, high-current systems place extra stress on factory electrical paths. Modern vehicles are also packed with complex computer networks and sensors that increase the overall electromagnetic interference (EMI) inside the cabin. When your audio system’s ground path is weaker than the charging system’s demands, that AC ripple searches for the easiest path to ground, often finding it through your RCA cables and into your speakers.
The Root Causes: Ground Loops and Signal Path Vulnerabilities
Noise in a sound system isn’t a random occurrence; it’s a measurable physical reaction to how electricity travels through your vehicle. The most frequent culprit is the “potential difference” between grounding points. Electricity is naturally lazy and always seeks the path of least resistance. If your amplifier’s ground connection has more resistance than the shield on your RCA cables, the system will attempt to use those signal cables as a secondary ground path. This technical explanation of alternator whine provides a deep dive into how AC ripple voltage exploits these circuit impedances. Understanding these physics is the foundation for troubleshooting alternator whine in car audio effectively.
Ground Loop Mechanics
We often see enthusiasts assume the car chassis is a perfect, universal ground. In reality, modern vehicles are held together by a mix of spot welds, structural adhesives, and layers of thick, insulating paint. These materials create resistance. If your head unit is grounded to a factory harness and your amplifier is grounded to a painted bolt in the trunk, they exist at different electrical potentials. This creates a loop where noise can circulate. We solve this by establishing a common ground or ensuring every point is sanded to bare, shiny metal to maintain a zero-ohm connection. A solid foundation is the only way to guarantee a silent background.
Cable Integrity and Shielding
Cable routing is just as critical as the connection points themselves. When you run high-current power cables parallel to low-level RCA signal wires, you create a transformer effect known as inductive coupling. The magnetic field generated by the power wire leaks noise directly into the audio lines. High-quality twisted-pair RCAs are engineered to reject this interference, whereas cheap, poorly shielded cables act like antennas for the engine’s electrical noise. We prioritize proper separation and high-grade shielding in our custom installations to prevent these vulnerabilities from the start. It’s about protecting the signal from the moment it leaves the source.
Hardware failures can also mimic wiring issues. A classic example is the “pico-fuse” found in certain head units. If you’ve ever unplugged an RCA cable while the system was powered on, you may have accidentally blown this tiny internal fuse. This failure breaks the ground shield of the radio, inviting massive amounts of whine into the signal path. Similarly, internal amplifier components can leak DC voltage into the signal if they’re damaged. By identifying whether the noise is a result of external routing or internal failure, we can save you from the frustration of replacing perfectly good components.
Isolating the Noise: A Systematic Diagnostic Framework
Randomly pulling wires often leads to more confusion than clarity. We prefer a logical, step-by-step approach to troubleshooting alternator whine in car audio. By isolating sections of your system, we can pinpoint exactly where the interference enters the signal path. This eliminates guesswork and prevents you from replacing components that are functioning perfectly. Our framework moves from the back of the vehicle to the front, ensuring no stone is left unturned.
The first step is the “Input Mute” test. Disconnect the RCA cables from your amplifier inputs while the system is off. Turn the vehicle on and listen. If the whistle remains, the amplifier itself or its specific grounding point is the culprit. If the noise disappears, the interference is entering the signal path further upstream. Next, we use a portable source bypass. Connect a phone or tablet directly to the amplifier using a 3.5mm-to-RCA adapter. If the music is crystal clear, you’ve confirmed your amplifier and speakers are fine; the issue lies with your head unit or the RCA cables running through the car.
We also look closely at gain structure. Many DIY enthusiasts treat gain as a volume knob, but its true purpose is matching the amplifier’s input sensitivity to the head unit’s output voltage. If your gains are set too high, you’re unnecessarily amplifying the system’s natural noise floor. Finally, we perform a “Jumper Wire” test on the head unit. By using a small piece of wire to temporarily connect the outer shield of an RCA plug to the metal chassis of the radio, we can diagnose a blown internal ground fuse. If the noise stops instantly, the radio requires internal repair or a permanent external ground strap.
The ‘Half-System’ Method
We divide complex, multi-amp systems into sections to find the “leaky” component. Using RCA shorting plugs is a professional trick to verify an amplifier’s internal noise floor. If the amp is silent with shorting plugs but noisy with anything else, the problem is external. This method allows us to clear the amplifier of any wrongdoing before we spend time tearing apart the dashboard to inspect the source unit.
Visual and Physical Inspections
Precision diagnostics require a multimeter. We measure the resistance between your amplifier’s ground terminal and the battery’s negative post. Any reading higher than 0.5 ohms indicates a weak connection that could invite noise. We also inspect the “Big 3” electrical foundations: the battery-to-chassis ground, the engine-to-chassis ground, and the alternator-to-battery positive cable. Loose connections or corroded terminals in these three areas are frequent causes of system-wide interference. Since 1994, we’ve found that a visual check often reveals “hot spots” where cables have been pinched or exposed to heat, compromising their shielding.
Proven Fixes: From Better Grounding to Signal Path Optimization
Many guides suggest buying a cheap filter as a first step, but we believe in solving the actual electrical problem rather than masking it. Troubleshooting alternator whine in car audio often reveals that a band-aid solution, like a ground loop isolator, can actually degrade your sound quality by killing bass response and dynamic range. Instead, we focus on establishing a rock-solid electrical foundation. Since 1994, our team has found that a permanent fix starts with the physical connection points between your equipment and the vehicle’s chassis.
The most effective fix is a professional-grade ground. We don’t just tighten a bolt; we use a wire wheel or sandpaper to remove every bit of paint, primer, and rust until we reach bare, shiny metal. This ensures a zero-ohm connection that prevents “potential differences” from forming. Once the connection is secure, we apply a clear zinc or battery terminal spray to prevent future oxidation. This level of detail is what separates a DIY project from a high-performance system that remains silent for years to come.
The ‘Big 3’ Upgrade Explained
Modern vehicles often rely on thin, 8-gauge factory wiring that isn’t built for high-performance audio. The ‘Big 3’ upgrade involves adding or replacing three critical cables with 1/0 or 4-gauge high-strand copper: the battery negative to chassis, the engine block to chassis, and the alternator plus to battery positive. The engine-to-chassis ground is frequently the primary culprit for noise because the engine sits on rubber mounts that isolate it electrically. A car audio upgrade for stock stereo requires this foundation because factory wiring is designed for minimal utility rather than the high-current demands of aftermarket amplifiers.
Advanced Signal Grounding
If your diagnostics point toward the head unit, you can sometimes “re-ground” the RCA outputs. By wrapping a small strand of copper wire around the outer shield of the RCA jack and securing it to the radio’s metal casing, you can bypass a blown internal pico-fuse. For more complex builds, we utilize Digital Signal Processors (DSPs) with optical inputs. Using light instead of copper to transfer the signal completely eliminates the possibility of a ground loop between the dash and the trunk. We also follow the “90-degree rule” during our professional installation services, ensuring that if a power cable must cross a signal wire, it does so at a right angle to minimize inductive coupling.
Signal-to-noise ratio is your best defense. If your head unit provides 4V or 5V pre-outs, your amplifier gains can stay lower, which naturally keeps the noise floor suppressed. If you’re stuck with a low-voltage source, a balanced line driver can boost that signal before it travels through the car, making it much harder for interference to latch on. By combining these physical and signal-path optimizations, we deliver a finished result that lets you focus on the music, not the mechanics of the car.
Advanced Solutions: High-Output Alternators and Professional Integration
For systems pushing the limits of high-performance output, the factory charging system often becomes the weakest link. This is where troubleshooting alternator whine in car audio moves from simple wiring checks into the territory of heavy-duty infrastructure. When you demand thousands of watts of power, a standard alternator struggles to maintain voltage, leading to excessive heat and increased AC ripple. A high output alternator for car audio is the professional answer for these extreme builds. However, simply bolting in a larger unit isn’t enough. Without precision integration, these powerful components can actually introduce more noise by overwhelming the vehicle’s original ground paths.
We approach these complex projects with a focus on the finished result rather than just the transaction of gear. High-current systems require a level of electrical management that goes beyond the capabilities of standard plastic mounts and thin factory brackets. We prioritize safety and functionality by ensuring that every component of the charging system is fused correctly and mounted securely. This eliminates the vibration and loose connections that frequently cause intermittent noise issues in high-output environments.
Custom Fabrication for Power Delivery
Stable current is the foundation of a silent noise floor. We use car audio fabrication to design custom battery racks and machined copper bus bars that minimize resistance at the source. These custom solutions allow us to integrate secondary batteries and high-current distribution blocks that look as good as they perform. By creating a dedicated, low-resistance path for your amplifiers, we effectively isolate the audio system from the rest of the vehicle’s noisy electronics. This proactive approach prevents ground loops before they have a chance to start, ensuring your music remains the center of attention.
When to Seek Professional Expertise
Modern luxury vehicles and late-model trucks present unique challenges that often baffle DIY enthusiasts. Many 2026 models feature complex CAN-bus networks and Active Noise Cancellation (ANC) systems that use microphones to “listen” to the cabin. When you add aftermarket subwoofers, the ANC system may try to cancel out the new bass frequencies, resulting in a persistent, engine-synced drone or whistle. Our team has the specialized tools to recalibrate or bypass these systems without compromising your vehicle safety system or factory warranties. Since 1994, we’ve positioned ourselves as partners who can navigate these digital hurdles to deliver the seamless integration you deserve. If you’ve followed the diagnostic steps and the noise persists, it’s likely a signal processing conflict that requires an expert’s touch.
Take Control of Your Sound Quality
Your path to a silent background starts with a shift in perspective. Rather than reaching for a temporary filter, focus on the electrical foundation of your vehicle. We’ve shown that systematic isolation and professional grounding to bare metal are the most reliable ways to eliminate interference. Whether you’re upgrading a factory setup or building a high-output custom system, the goal is a finished result where the only thing you hear is your music. High-performance audio deserves a foundation that is as robust as the components themselves.
Since 1994, we’ve specialized in high-performance electrical integration. We understand that troubleshooting alternator whine in car audio can be a complex puzzle, especially when navigating the digital hurdles of modern vehicle networks. Our team brings over 30 years of custom installation experience to every project, focusing on delivering a result that works in perfect harmony with your vehicle. You don’t have to settle for a compromised listening experience. Let our experts dial in your perfect, noise-free sound system today. We’re ready to help you rediscover your favorite tracks without the distraction of engine noise.
Frequently Asked Questions
Is alternator whine dangerous for my car’s speakers or amplifier?
Alternator whine isn’t usually dangerous to your speakers or amplifier in the short term. It’s an audible symptom of electrical interference rather than a destructive force. However, a high noise floor can lead you to turn up the volume into distortion levels to compensate. This clipping is what eventually damages voice coils. We recommend addressing the noise early to protect your investment and restore the clarity of your music.
Can a bad car battery cause alternator whine in my speakers?
A failing car battery is a frequent cause of system noise. The battery acts as a natural filter, smoothing out the pulses of electricity from your alternator. When a battery’s internal resistance increases due to age or damage, it loses this filtering ability. This allows AC ripple to enter your power lines. If your battery is more than three or four years old, testing it is a logical first step.
Why does my alternator whine only happen when the headlights are on?
Headlights place a significant current demand on your vehicle’s charging system. When you turn them on, the alternator must work harder to maintain voltage, which increases the intensity of the AC ripple. This extra load also highlights weak grounding points that might have been sufficient at lower current levels. If the whine intensifies with your lights, we often find the engine-to-chassis ground needs reinforcement to handle the increased electrical flow.
Will a ground loop isolator reduce the sound quality of my audio system?
Most ground loop isolators do reduce sound quality because they use small, inexpensive transformers to break the electrical connection. These transformers often roll off deep bass frequencies and can introduce slight phase shifts in your music. While they provide a quick fix, they are a band-aid that masks the problem. We prefer finding the root cause of the noise to maintain the full dynamic range of your high-performance system.
How do I know if my alternator itself is failing or if it’s just a wiring issue?
You can test your alternator using a digital multimeter set to the AC voltage scale. With the engine running, touch the probes to your battery terminals. A healthy alternator should show less than 0.5 volts of AC ripple. If you see a higher reading, the internal diode bridge is likely failing. If the AC reading is low but you still hear noise, the issue is almost certainly related to your wiring or grounding.
Does the gauge of my power wire affect how much engine noise I hear?
Power wire gauge doesn’t directly cause noise, but undersized cables create significant voltage drops. When an amplifier doesn’t receive stable voltage, its internal power supply works harder and can become more sensitive to interference. We’ve seen many cases where thin, 8-gauge factory wiring is the culprit. Upgrading to 4-gauge or 1/0-gauge high-strand copper ensures your equipment has the current it needs to stay quiet and perform at its peak.
What is the ‘Big 3’ upgrade, and does it really stop alternator noise?
The ‘Big 3’ upgrade involves reinforcing the battery-to-chassis, engine-to-chassis, and alternator-to-battery cables with high-current wiring. This is a foundational step when troubleshooting alternator whine in car audio because it lowers the overall resistance of your vehicle’s electrical system. By providing a clear, low-resistance path for current to return to the battery, you eliminate the potential differences that cause ground loops. We consider this essential for any high-performance build.
Why did the whine start only after I installed a new amplifier?
Adding a new amplifier often exposes existing electrical weaknesses that weren’t audible before. The new amp might have a different internal ground reference or higher input sensitivity than your previous gear. It’s also possible you chose a new grounding point that has higher resistance than the original. We suggest re-evaluating your ground connection by sanding the mounting point to bare metal to ensure the new component has a perfect reference.