If you think that gain knob on the side of your amp is just another volume dial, you’re likely one heavy bass track away from a very expensive mistake. We know the frustration of finishing a fresh install only to deal with annoying background hiss or the constant fear of blowing a brand new subwoofer. It’s a common pain point, but you shouldn’t have to choose between high volume and equipment safety. Learning how to properly set car amplifier gains is the single most important step in achieving professional-grade sound quality that lasts.
In this 2026 guide, we’ll teach you the exact sensitivity-matching process we use to eliminate clipping and protect your investment. We prioritize the Music In Motion Standard, which focuses on delivering a finished result where every component works in harmony. We’ll walk you through the essential tools, from digital multimeters to handheld oscilloscopes, and explain how to hit that perfect balance of power and clarity. You’ll learn how to find your source unit’s limit and set your levels for distortion-free audio that stays reliable, even when the volume is cranked.
Key Takeaways
- Understand that gain is an input sensitivity handshake rather than a power boost, which is the first step to preventing costly speaker failure.
- Master the manual process of how to properly set car amplifier gains using a digital multimeter to achieve precise power matching without audible distortion.
- Learn why disconnecting your speakers and using specific 40Hz and 1kHz test tones is essential for protecting your equipment during the tuning phase.
- Discover how proper gain staging lowers your system’s noise floor to permanently eliminate annoying background hiss and alternator whine.
- Explore the professional standards we use to ensure system longevity, including the use of oscilloscopes and custom fabrication for optimal airflow.
Understanding Gain: Why It Is Not a Volume Knob
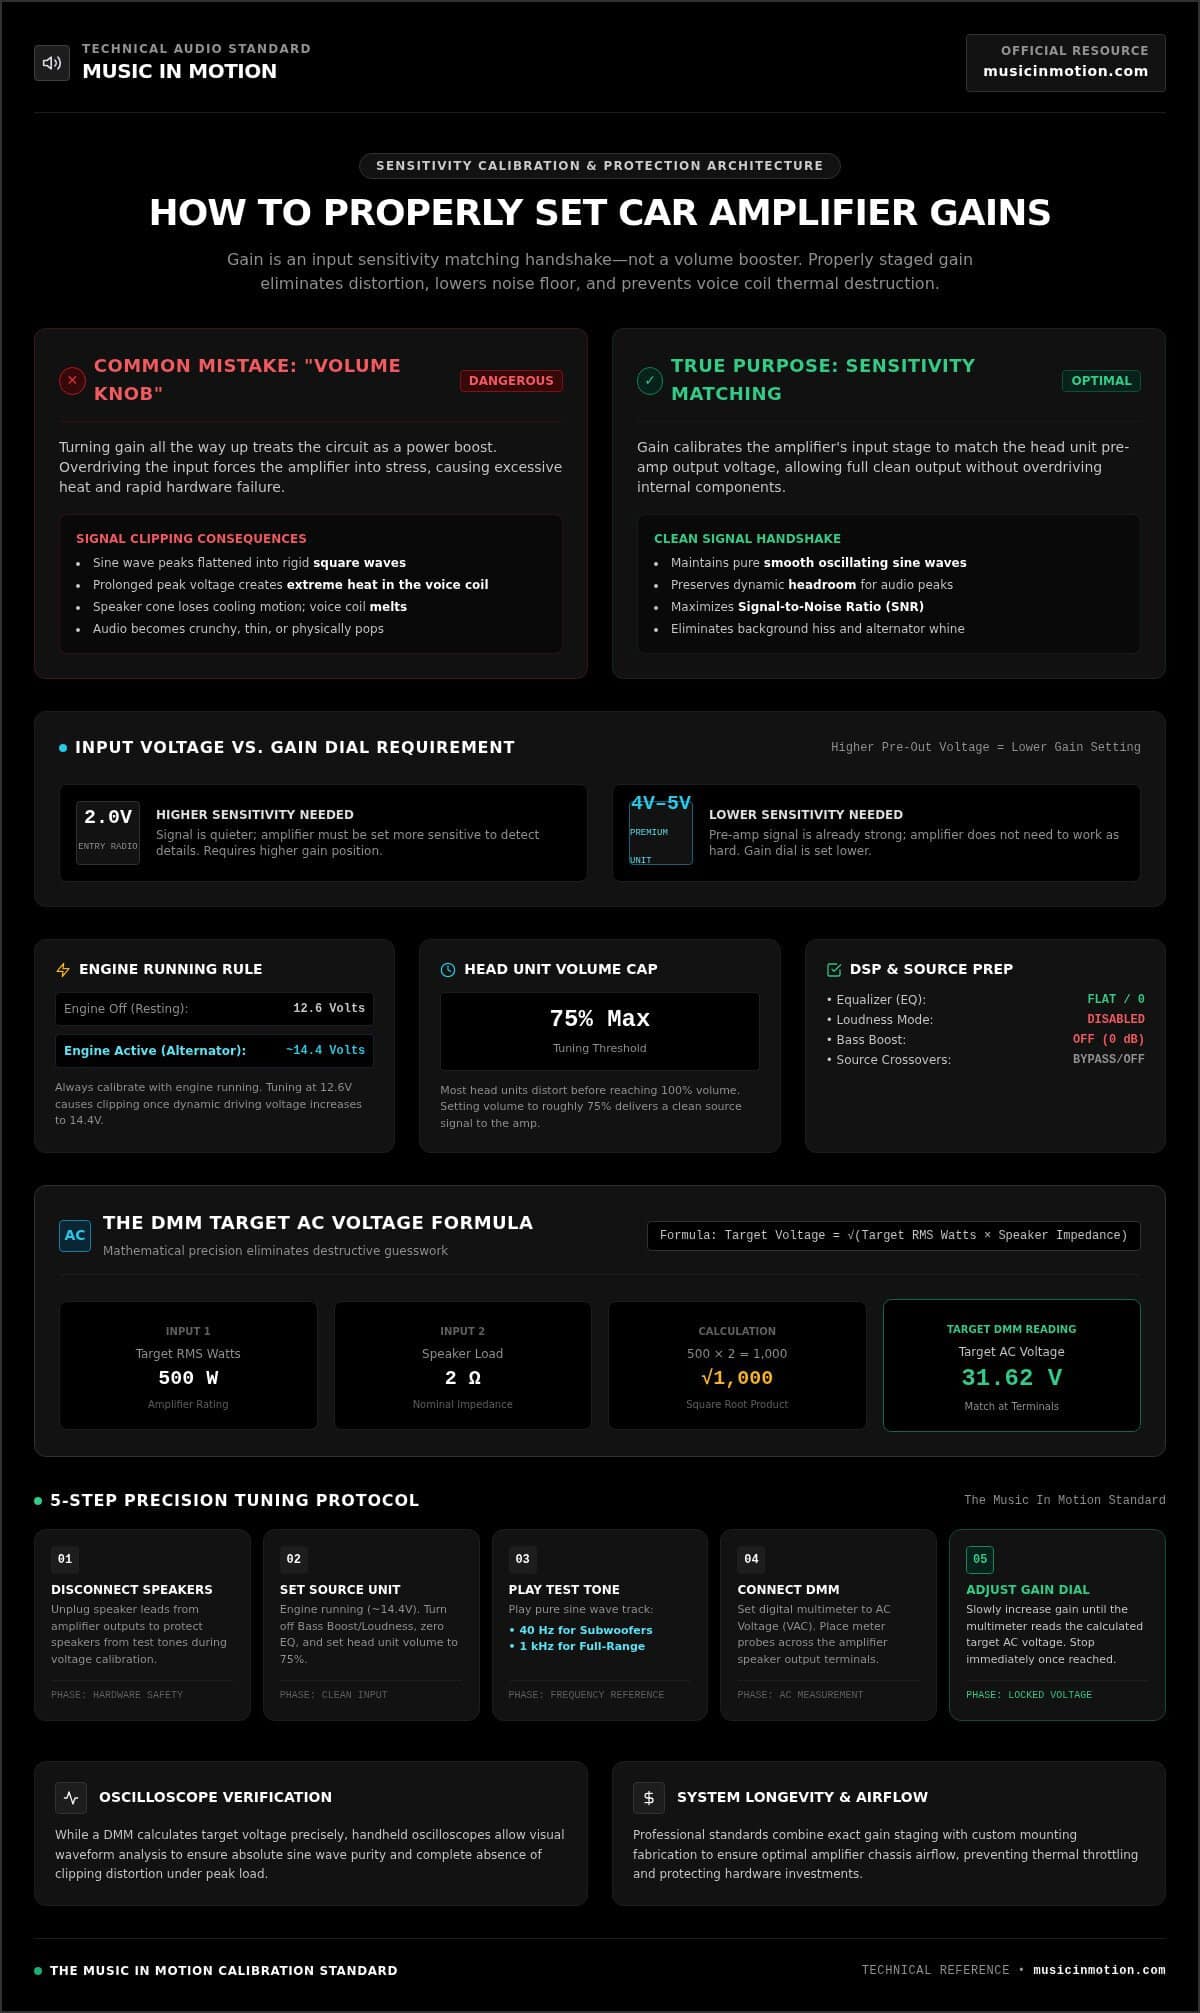
We see it all the time. A customer installs a powerful new system, turns the gain dial all the way up, and wonders why their music sounds harsh or why their subwoofers smell like burning plastic. It’s a common mistake to treat that dial as a volume knob. In reality, gain is an input sensitivity control. Its only job is to match the output level of your head unit to the input circuit of your amplifier. This ensures the amp can reach full power without being overdriven.
Think of this process as a signal handshake. Your head unit sends a specific voltage through the RCA cables. If the amplifier’s sensitivity is set too high, it tries to amplify a signal that is already too strong for its internal components to handle. This doesn’t give you more power; it just forces the amplifier into a state of stress. Learning how to properly set car amplifier gains ensures this handshake is firm and clear, rather than a shouting match that destroys your gear. When we tune a system, we aren’t just looking for volume; we’re looking for the maximum clean output your hardware can safely provide.
Input Voltage vs. Output Power
Every head unit is different. Some entry-level radios output a 2V pre-amp signal, while premium units can push 4V or even 5V. If you have a high-voltage head unit, your gain dial will actually need to be set lower. A 4V signal is already “loud” to the amplifier, so the amp doesn’t have to work as hard to hear it. Conversely, a 2V signal requires the amp to be more sensitive to catch the details. We focus on this balance to ensure your system reaches its full potential without raising the noise floor. Our goal is always to keep the signal-to-noise ratio high, which prevents that annoying background static often found in poorly tuned systems.
The Dangers of Signal Clipping
When the gain is set incorrectly, the amplifier runs out of “headroom” to reproduce the signal. Instead of producing a smooth, oscillating sine wave, the peaks of the wave are flattened into a rigid square shape. This audio clipping distortion is the primary reason for equipment failure. Because a clipped wave stays at peak voltage longer than a sine wave, it generates massive amounts of heat in the speaker’s voice coil. The cone stops moving effectively to cool itself, and the coil eventually melts. If your audio sounds crunchy, thin, or physically “pops” at high volumes, you are hearing the sound of your equipment dying. This is why mastering how to properly set car amplifier gains is the most critical part of any high-performance installation.
Essential Tools and Preparation for Gain Setting
Before you touch a single dial, you need the right environment and the right tools. We always recommend tuning your system with the engine running. A car’s electrical system typically rests around 12.6 volts when off, but it jumps to roughly 14.4 volts when the alternator is active. Since you’ll be listening to your music while driving, you want your gains matched to that higher operating voltage. Tuning with the engine off often leads to a system that clips once you hit the road and the voltage fluctuates.
Preparation also involves optimizing gain structure at the source. This means going into your head unit settings and turning off every enhancement available. Disable the Loudness setting, set the EQ to flat or zero, and turn off any Bass Boost or crossover filters on the radio. These features alter the signal’s output voltage and will give you a false reading during the calibration process. If you’re looking for a professional result, starting with a clean, uncolored signal is non-negotiable.
The Digital Multimeter (DMM) Advantage
You don’t need a thousand-dollar oscilloscope to get great results. A standard digital multimeter is a fantastic tool for how to properly set car amplifier gains with precision. It allows you to target a specific AC voltage output rather than guessing by ear. To find your target, use the formula: Square Root of (Target RMS Watts x Speaker Impedance). For example, if you have a 500-watt amp running a 2-ohm load, you’d calculate the square root of 1,000, which is approximately 31.62 volts. This mathematical approach removes the guesswork and protects your hardware from thermal failure.
Optimizing the Source Signal
Most head units begin to distort their internal signal before they reach 100% volume. As a general rule, we set the head unit to about 75% of its maximum volume during the tuning process. This ensures the signal entering your amplifier is as clean as possible. You’ll also need specific test tones: a 40Hz sine wave for subwoofers and a 1kHz sine wave for full-range speakers. While a 0dB tone is technically pure, many installers use a -5dB or -10dB tone to account for the way modern music is recorded. If you find the technical side of how to properly set car amplifier gains a bit daunting, our team at Music In Motion is always ready to help you dial in your system for peak performance.
The Step-by-Step Guide to Setting Gains Manually
Once you’ve prepared your environment and gathered your tools, it’s time to perform the actual calibration. The first and most critical step is to disconnect your speakers or subwoofers from the amplifier. High-frequency sine waves played at high volumes can quickly overheat voice coils, and since we are measuring the electrical output of the amp rather than the sound itself, the speakers don’t need to be connected yet. This safety measure ensures you don’t accidentally damage your equipment while learning how to properly set car amplifier gains.
With the speakers disconnected, turn the gain dial on your amplifier all the way down to its minimum setting. Insert your test tone media and set your head unit to the 75% volume mark we established earlier. For subwoofer amplifiers, play a 40Hz sine wave; for full-range amplifiers powering door speakers or tweeters, use a 1kHz tone. We recommend setting amplifier gain with test tones that are recorded at -5dB or -10dB to provide a little extra headroom for quieter recordings in your music library.
The DMM Method: Precision Tuning
Set your digital multimeter to measure AC Voltage. Place the red probe on the positive speaker output terminal and the black probe on the negative terminal. While the test tone is playing, slowly turn the gain dial clockwise. Watch the display on your multimeter carefully. You want to stop turning the moment the screen matches the target voltage you calculated earlier. For a monoblock amplifier rated at 500 watts RMS into a 2-ohm load, your target AC voltage is exactly 31.62 volts. Adjust the dial in tiny increments to avoid overshooting this number, as even a small turn can represent a significant jump in power.
The Ear Method: Tuning for the Human Experience
If you don’t have a multimeter, you can use your ears, though we always suggest this as a secondary backup. Reconnect your speakers and, starting from the minimum setting, slowly increase the gain while the test tone plays. Listen for a distinct change in the sound of the tone. When the smooth sine wave begins to distort, it will sound “thin,” “harsh,” or like it has a slight “buzz” added to it. The moment you hear this shift, stop and back the dial off about 1/8th of a turn. This method relies on human perception, which can be subjective, so use it carefully. Mastering how to properly set car amplifier gains by ear takes practice, but it’s a vital skill for identifying issues when you’re away from your toolbox. Once finished, play a familiar track at high volume to ensure the system sounds clear, punchy, and effortless.
Advanced Tuning: Avoiding Noise and Troubleshooting
Even after you’ve mastered the basics of how to properly set car amplifier gains, you might encounter unexpected issues like background hiss or alternator whine. This often comes down to the noise floor, which is the constant level of electronic background noise present in any system. If your gain is set too high, you’re amplifying this noise along with your music. We aim for a silent background, ensuring that when the song stops, the speakers are completely quiet. This is a hallmark of a professional installation and a standard we strive for in every project.
Alternator whine, that high-pitched whistle that changes with your engine speed, is another common headache. It’s usually caused by a ground loop or poor gain staging. If you’ve cranked the gain to make up for a weak signal from your head unit, you’re inviting that interference into your audio path. By maximizing the clean output from your radio and keeping the amplifier’s sensitivity lower, you can often push that whine out of the audible range. If your gain is already at the minimum setting and the system is still too loud, you likely have high-voltage pre-outs that are overdriving a sensitive amplifier input. In these cases, we sometimes use inline attenuators to bring the signal back into a manageable range.
Signal-to-Noise Ratio (SNR) Optimization
The goal of how to properly set car amplifier gains is to achieve the best possible signal-to-noise ratio. This means the music signal is much stronger than the inherent noise of the electronics. Using high-voltage RCA pre-outs (4V to 5V) is a massive advantage here. A stronger signal allows you to keep the gain dial lower, which keeps the noise floor at the bottom of the spectrum. We always prioritize a clean source signal over trying to force volume at the amplifier stage, as this preserves the dynamic range of your favorite tracks.
Common Gain Setting Mistakes
We see several recurring mistakes that can compromise your soundstage or even damage your equipment. Avoid using the Bass Boost feature as a way to get more volume; this is an EQ adjustment, not a gain setting, and it almost always leads to clipping. Other common errors include:
- Remote Bass Knobs: These are usually attenuators. If you tune your gain with the knob at 50%, you will likely clip the signal when you turn the knob to 100%.
- Multi-Amp Systems: Gains must be matched across all amplifiers to ensure your front speakers don’t overpower your subwoofers, or vice versa.
- Crossover Interaction: Changing your crossover points after setting your gains can alter the perceived loudness and may require a quick recalibration to keep things balanced.
Precision tuning is the difference between a system that sounds okay and one that provides a truly immersive experience. If you want to ensure your system is performing at its absolute peak, contact us for a professional integration and tuning service.
Professional Integration: The Music In Motion Standard
We believe a sound system should be more than a collection of parts. It should be a finished result that enhances your daily drive. While we’ve discussed how to properly set car amplifier gains using multimeters, our shop standard involves precision oscilloscopes. These tools allow us to see the actual sound wave in real-time. We can identify even the slightest flattening of a sine wave that the human ear simply can’t detect. By visualizing the electrical signal as a physical waveform, we can eliminate the distortion that digital multimeters might miss. This level of accuracy is why a professionally tuned system often sounds much louder and more impactful. Clean signals provide better dynamic range, which makes the music feel powerful without being fatiguing.
Cooling is another factor often overlooked in DIY installs. We use car audio fabrication to create mounting solutions that prioritize airflow. An amplifier that stays cool maintains its efficiency and longevity. When we integrate a car audio upgrade for stock stereo, we aren’t just adding power. We’re correcting the factory EQ curves and ensuring the new hardware plays perfectly with your vehicle’s existing electronics. This holistic approach ensures that your investment is protected and performs at its absolute peak.
Beyond the Gain Knob: Holistic System Tuning
Understanding how to properly set car amplifier gains is only the beginning of a great-sounding system. We also focus on time alignment and phase correction to create a perfect center image on your dashboard. This makes the music sound like it’s coming from a stage in front of you rather than from the floorboards. We also prioritize professional-grade wiring and secure connections. These details maintain signal integrity and prevent the voltage drops that lead to premature clipping. Our goal is to improve your daily life through superior sound, focusing on the internal experience of the user.
When to Call the Experts
Modern vehicles present unique challenges that standard tuning methods can’t always solve. Many new cars feature integrated factory noise cancellation or complex digital signal processing that can fight against your new gear. If you’re working with a multi-amp system using active crossovers, the complexity increases exponentially. We have the specialized knowledge to navigate these utility systems safely and effectively. We take pride in pushing creative boundaries for complex custom projects while ensuring total reliability. Ready for a system that performs? Explore our custom installation services and let us help you achieve the perfect audio experience.
Achieve Professional Clarity and System Longevity
Mastering the sensitivity handshake between your head unit and amplifier is the foundation of a high-performance audio system. By following the precise steps on how to properly set car amplifier gains, you’ve moved beyond the “volume knob” myth and taken a vital step toward protecting your speakers from thermal damage. Whether you use a digital multimeter for mathematical accuracy or rely on visual waveform analysis, your goal remains the same. You want distortion-free sound that hits with impact and stays reliable for years to come.
Since 1994, we’ve helped our customers push the limits of their audio experience. We are specialists in custom subwoofer enclosures and expert tuning for a wide range of transport, including cars, boats, and motorcycles. We focus on the finished result. Every component in your vehicle must work in harmony to improve your daily drive. If you’re ready to take your system to the next level without the guesswork, upgrade your sound with a professional installation from Music In Motion. Your journey toward perfect, professional-grade audio starts with a single, well-calibrated signal.
Frequently Asked Questions
Can I set my gain by ear without any tools?
You can set your gain by ear, but it is much less accurate than using measurement tools. The human ear often fails to detect harmonic distortion until it reaches roughly 10%, which is high enough to cause voice coil damage. We recommend using at least a digital multimeter to ensure your voltage matches the manufacturer’s specs. Precision tuning is the best way to protect your investment and enjoy clear sound.
What frequency test tone should I use for my subwoofer?
You should use a 40Hz to 50Hz sine wave for most subwoofer applications. This frequency range is where subwoofers do their heaviest work and where clipping is most likely to occur. While a 0dB tone is technically pure, we often use a -5dB or -10dB tone to account for the dynamic range of modern music. This ensures your sub has enough output for quieter recordings without risking distortion.
Why does my amp go into protect mode when I turn the volume up?
Your amplifier likely enters protect mode because it is clipping or overheating due to an incorrect gain setting. When the gain is set too high, the amp tries to push more power than its internal components can safely handle. This creates excessive heat and triggers a safety shutdown. It might also indicate a voltage drop in your electrical system or an impedance mismatch between the amp and your speakers.
Does a higher gain setting mean more power from my amplifier?
No, a higher gain setting does not increase the maximum power your amplifier is capable of producing. It simply makes the amplifier reach its full potential at a lower volume level on your head unit. If you turn the gain up too high, you aren’t getting more power; you are just introducing distortion. This clipped signal can quickly destroy your speakers and subwoofers through excessive heat buildup.
Should I set my gain with the bass boost turned on?
No, you should always set your gain with the bass boost, EQ, and loudness settings turned off or set to flat. Bass boost is an equalizer adjustment that increases the signal at a specific frequency. If you tune your gain with it active, you’ll likely clip the signal once you play music with heavy bass. We prioritize a clean, uncolored signal during the calibration process to ensure total system reliability.
What is the difference between gain and master volume?
Master volume controls the output level of your head unit, while gain matches the amplifier’s sensitivity to that specific output. Think of the volume as how much signal you’re sending and the gain as how sensitive the amplifier is to that signal. Learning how to properly set car amplifier gains ensures these two controls work together. This creates a finished result where you achieve full volume without introducing a distorted signal.
How do I know if my amplifier is clipping?
Audible signs of clipping include a “crunchy” or “thin” sound, or a distinct buzz in the music at high volumes. Some modern amplifiers feature built-in LED clipping indicators that flash when the signal is distorted. However, since the human ear is often unreliable at high frequencies, we use oscilloscopes to visually confirm a clean, smooth sine wave. This visual verification is the only way to be 100% sure your signal is safe.
Will setting my gain correctly make my system quieter?
It might seem quieter at first if you were previously listening to a distorted signal, but the overall output will be cleaner and more impactful. A properly tuned system can actually sound “louder” because it lacks the harshness that causes listener fatigue. By understanding how to properly set car amplifier gains, you achieve the maximum undistorted volume your specific hardware can safely handle. You’ll enjoy a much more immersive and dynamic listening experience.