Your car audio system has a hard electrical ceiling. Pushing past it doesn’t just ruin the song; it turns your expensive speakers into literal heating elements. We know the frustration of hitting that volume limit where the music loses its clarity and starts to sound thin, harsh, or muddy. It’s stressful to wonder if the next heavy bass hit will be the one that finally melts a voice coil. You’ve invested in a high-end experience, and the fear of hardware failure shouldn’t keep you from turning up the dial.
We believe every driver deserves a system that’s as reliable as it is powerful. In this guide, we’ll show you how to identify the specific car amplifier clipping symptoms that signal danger before your components are destroyed. We’ll bridge the gap between technical jargon and the sensory signs you can hear and feel. You’ll learn to recognize audible distortion, understand the physical warning signs of overheating, and gain the clarity needed to distinguish between gain settings and volume control. By the end, you’ll have the actionable steps required to tune your system for a balanced, finished result that sounds incredible at any level.
Key Takeaways
- Identify the most common car amplifier clipping symptoms like harsh distortion and muddled dynamics before they lead to permanent hardware failure.
- Understand why improper gain settings are the primary cause of signal damage and how they differ from standard volume adjustments.
- Learn about the professional tools used to troubleshoot clipping, including oscilloscopes and digital multi-meters, for precise system calibration.
- Discover the role of Digital Signal Processing (DSP) in creating a protective ceiling that ensures long-term reliability for your high-end components.
- Focus on achieving a balanced “finished result” through expert tuning that prioritizes both peak audio performance and equipment safety.
What is Car Amplifier Clipping and Why Does It Happen?
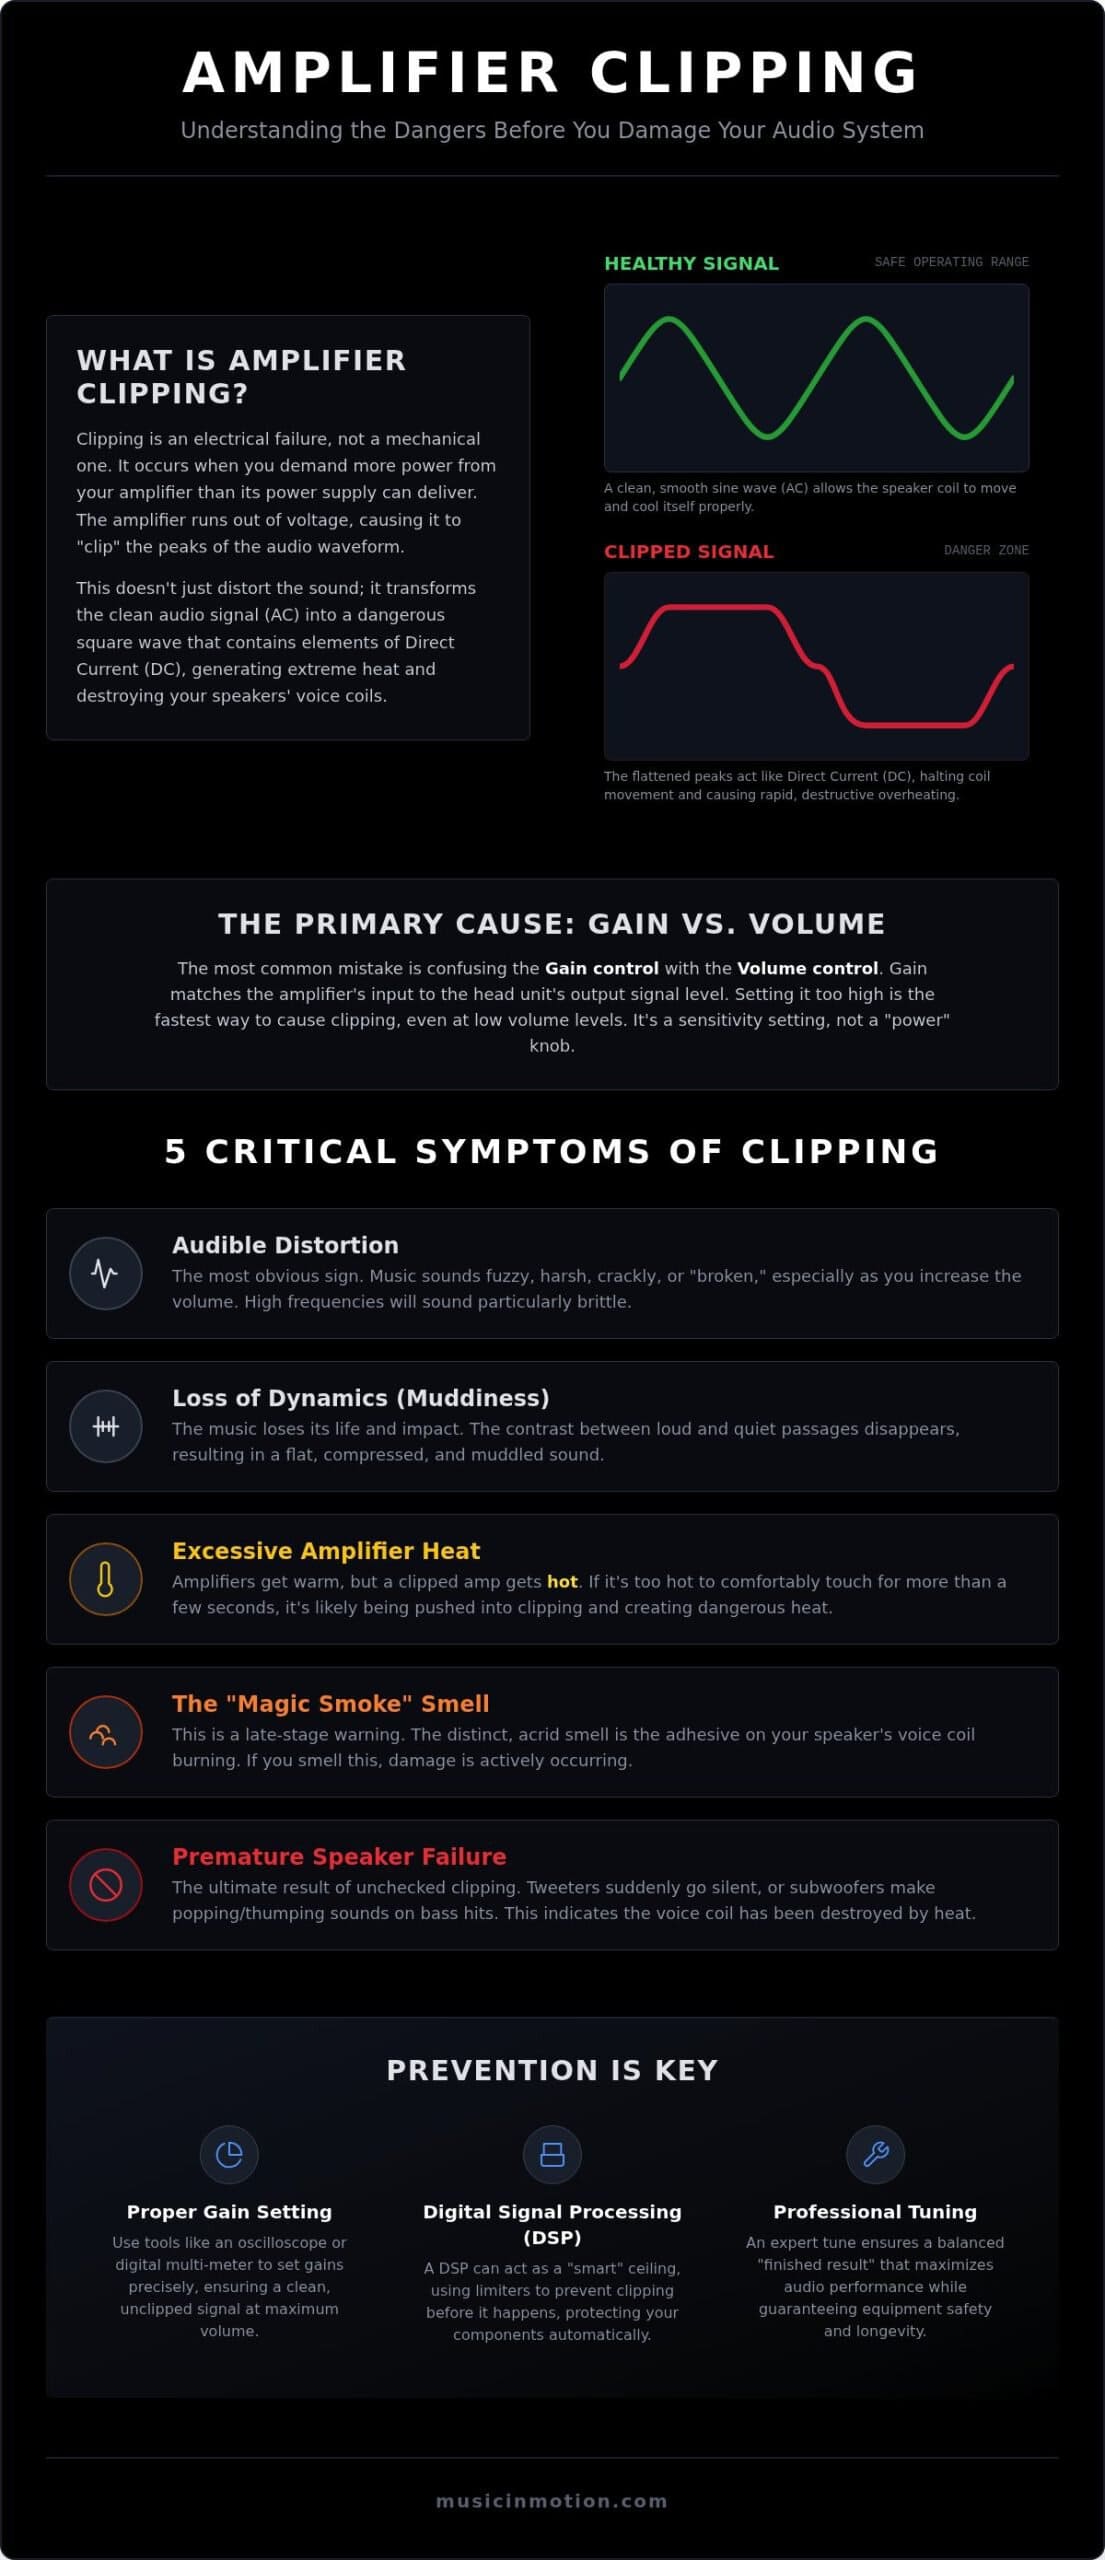
Clipping isn’t a mechanical failure of your speakers; it’s an electrical limitation of your amplifier. When you push your system to its limit, the amplifier eventually runs out of the voltage required to reproduce the music cleanly. This phenomenon, known as Clipping (audio), occurs when the amplifier tries to deliver more power than its internal power supply can provide. Instead of a smooth, flowing sound wave, the peaks and valleys of the signal are literally cut off. This creates a “flattened” wave that sounds harsh and carries dangerous amounts of heat. Recognizing car amplifier clipping symptoms early is the best way to protect your investment.
It is a common misconception that speakers “blow” simply because they are too loud. In reality, most damage occurs because the amplifier has reached its electrical ceiling. When the signal is forced beyond this point, the smooth sine wave becomes a “squared-off” wave. This transformation is where the danger lives. We focus on ensuring your system stays within its safe operating window so you never have to worry about the cost of replacement parts.
The “Flattened Wave” Analogy
Think of an audio signal like a person jumping in a room. In a healthy system, the ceiling is high enough for the person to jump as high as they want. The movement is fluid and natural. However, when you turn the gain or volume up too high, you’re essentially lowering that ceiling. Eventually, the person’s head hits the drywall. In your audio system, that ceiling is the amplifier’s maximum rail voltage. When the signal hits this electrical roof, it can’t go any higher, so the top of the wave becomes a flat line. This impact creates the jagged, square-wave shape that produces the gritty sound we call distortion. It’s a clear sign that your hardware is working outside its safe operating range.
The Relationship Between Signal and Power
A clean audio signal requires “headroom.” This is the extra space an amplifier has available to handle sudden peaks in music, like a sharp snare hit or a deep bass drop. If the power supply is weak or the demand is too high, that headroom disappears. We often see this when performing car audio upgrades for stock stereos, as factory systems often lack the robust power management needed for high-performance aftermarket gear.
The most critical danger during clipping is the change in the electrical signal itself. Music is Alternating Current (AC), which keeps the speaker’s voice coil moving back and forth. When a wave clips, the flat top of the wave acts like Direct Current (DC). For those brief moments, the speaker stops moving but continues to receive full power. Without the cooling airflow from movement, the coil heats up rapidly. This is why car amplifier clipping symptoms are often the precursor to a “blown” speaker. It isn’t the volume that kills the speaker; it’s the heat from the clipped, square-shaped signal.
5 Critical Car Amplifier Clipping Symptoms You Must Recognize
You don’t need a degree in electrical engineering to spot a system in distress. Most car amplifier clipping symptoms manifest as sensory warnings that something is wrong. If you pay attention to these five signs, you can save your speakers from a trip to the trash bin. We want you to feel confident when you turn the key, knowing your audio is crisp and safe.
- Audible Distortion: This is the most common indicator. Your music starts to sound fuzzy, crackly, or generally “broken” as you increase the volume.
- Loss of Dynamics: The music loses its life. The loud and quiet parts of a song begin to sound the same, resulting in a muddled, flat experience.
- Excessive Amplifier Heat: While amps get warm, they shouldn’t be too hot to touch. Excessive heat often means the amp is trapped in a clipped state.
- The Electrical Smell: This is a late-stage warning. It’s the scent of burning voice coil adhesive, signaling that your speakers are literally cooking.
- Premature Speaker Failure: If your tweeters suddenly go silent or you hear repeated popping during bass hits, clipping has likely already caused mechanical damage.
A deeper understanding of amplifier clipping and distortion reveals that these symptoms are the direct result of electrical stress. When the system is pushed too hard, the hardware struggles to keep up, leading to these distinct failures.
Audible Clues: Identifying the Sound of Stress
One of the earliest signs of clipping is the “thinning” of bass notes. Instead of a deep, resonant thump, your kick drum might start to sound like a sharp, metallic “click.” This happens because the amplifier can’t provide the sustained energy needed for low frequencies. As the signal degrades, vocals often become grating or “shouty” rather than clear and natural. Square wave distortion is the primary cause of this harmonic harshness, adding artificial noise that was never part of the original recording. If you’re noticing these changes, our team at musicinmotion.com can help you recalibrate for a cleaner sound.
Physical Symptoms: Heat and Smell
When an amplifier clips, the signal stays at “peak voltage” for longer periods. This sends a constant stream of energy to the voice coil without the usual breaks found in a clean wave. This lack of rest causes the coil to heat up rapidly. You might notice a distinct acrid, metallic scent, which is the smell of the speaker’s internal components “cooking.” If you smell this in your cabin, turn the volume down immediately. The damage may already be permanent, and continuing to play the music will only accelerate total failure.
The Root Causes: Why Your Amplifier is Clipping
Identifying car amplifier clipping symptoms is the first step, but stopping the damage requires looking at the root causes. Clipping is rarely a random event. It’s usually the result of a specific setup error or an electrical bottleneck that prevents your hardware from performing at its peak. We approach every installation as a complete ecosystem, ensuring that every component from the head unit to the speakers works in harmony.
There are four primary reasons your system might be hitting its electrical ceiling:
- Improper Gain Setting: This is the most frequent culprit. When the gain is set too high, the amplifier tries to produce more voltage than its power supply can handle.
- Source Unit Distortion: If your radio or head unit clips the signal at high volume, the amplifier simply makes that distorted signal louder. This is common in factory systems pushed past 80% volume.
- Voltage Drop: Your amplifier needs a steady flow of current. If your car’s electrical system can’t keep up, the amp will starve and the signal will flatten.
- Impedance Mismatch: Wiring speakers to an ohm load lower than what the amplifier is rated for forces the internal components to work too hard, leading to rapid clipping and heat.
Gain vs. Volume: The Great Misconception
Many people treat the gain control like a second volume knob, but it’s actually a sensitivity adjustment. Its job is to match the amplifier’s input stage to the output voltage of your head unit. When you use the gain to compensate for a weak source signal or to try and get “extra” power, you’re inviting car amplifier clipping symptoms into your system. Think of gain as a gateway. If you open it too wide, you let in “noise” and distortion that the amplifier wasn’t designed to handle. Our rule of thumb is simple: gain is for matching, not for making it louder.
Electrical Starvation and Voltage Drop
Amps don’t make power out of thin air; they convert the DC voltage from your vehicle into the AC signal that drives your speakers. If your battery voltage drops during a heavy bass hit, the amplifier’s power supply can’t maintain the height of the audio wave. This “electrical starvation” is a leading cause of square-wave distortion. High-performance systems often require a “Big Three” wiring upgrade or a high-output alternator to stay stable. We prioritize these foundations during custom car audio fabrication to ensure your system has the electrical backbone to deliver a finished result without compromise.
How to Troubleshoot and Prevent Clipping
While recognizing car amplifier clipping symptoms is vital, fixing the issue requires a shift from guesswork to measurement. Many enthusiasts rely on their ears to set gains. This is dangerous. By the time you hear audible distortion, the signal has often been clipping for quite a while, putting your speakers at risk. We use technical precision to find the exact limits of your hardware, ensuring your system performs reliably without the threat of heat damage.
To stop clipping before it starts, you should follow a systematic approach to tuning:
- Find the Head Unit Limit: Every stereo has a “max clean volume.” Turn up your head unit until the signal distorts, then back off slightly. This is your new maximum volume ceiling.
- Use Active Monitoring: Many modern amplifiers include built-in clipping indicator LEDs. If these lights flicker red during heavy bass hits, your amp is reaching its electrical limit.
- Calibrate the Gain: Use a professional tool to match the amplifier’s sensitivity to your source unit’s output.
The Professional Toolset: Oscilloscopes and DD-1s
Human hearing is notoriously unreliable for detecting low-level distortion, especially in high frequencies that destroy tweeters. An oscilloscope solves this by providing a real-time visual of the audio wave on a screen. If the wave begins to square off, you see the “flat head” instantly. A DD-1 (Distortion Detector) can identify clipping at specific frequencies, ensuring your signal is pure from the start. These tools allow us to deliver a finished result that prioritizes both sound quality and equipment longevity.
Setting Gains with a Multi-Meter
If you don’t have an oscilloscope, the Digital Multi-Meter (DMM) method is a reliable alternative. You’ll need to calculate your target AC voltage using the formula: Voltage = Square Root of (Target Watts x Speaker Resistance). For example, if you want 500 watts at 2 ohms, your target is approximately 31.6 volts. Disconnect your speakers and play a test tone, then turn the gain until the DMM matches your calculated voltage. We recommend using a -5dB tone for subwoofers to allow for music recorded at lower levels, while a 0dB tone is safer for delicate tweeters. Backing off slightly from the maximum target provides the headroom necessary for a stable system. If you’re unsure about your settings, contact our experts at Music In Motion to schedule a professional tuning session and protect your gear.
The Finished Result: Professional Tuning for System Longevity
High-end hardware is only half the battle. You can buy the most expensive subwoofers and amplifiers on the market, but if they aren’t balanced correctly, they’re still vulnerable to failure. We’ve seen countless premium systems fail because they were “installed” but never truly tuned. When a system isn’t calibrated to its specific environment, car amplifier clipping symptoms can appear even on top-tier gear. Our goal is to move beyond the transaction of parts and deliver a finished result that sounds incredible and lasts for years.
The secret to system longevity often lies in Digital Signal Processing (DSP). A DSP acts as the brain of your audio system, allowing us to set precise limiters. These limiters act as a digital safety net, preventing the signal from ever reaching the “flattened wave” state that causes heat damage. By using technical precision to cap the output just below the point of distortion, we ensure your speakers never receive the dangerous DC-like current that melts voice coils. This level of control is what separates a standard DIY project from a professional-grade installation.
Many people overlook how custom fabrication impacts electrical performance. If an amplifier is mounted in a space without proper airflow, its internal temperature rises, its efficiency drops, and it begins to clip much earlier than it should. We use specialized mounting techniques and custom-fabricated panels to maximize heat dissipation. This focus on thermal management ensures your system remains stable even during long summer drives or high-volume listening sessions.
Why Professional Tuning Matters
There’s a massive gap between “making it work” and professional car audio tuning. We use Real Time Analyzers (RTA) to visualize the entire frequency spectrum of your cabin. This allows us to identify and flatten “peaks” where certain frequencies might be overdriving your amplifier. By smoothing out these electrical hurdles, we provide the headroom your system needs to breathe. You get the peace of mind that comes with a system designed for all-day performance, not just a five-minute demo.
Protecting Your Investment
We believe in doing the job right the first time. A one-time professional tuning session is significantly more affordable than replacing a pair of blown subwoofers or a fried amplifier. When you choose a specialist who prioritizes the finished result over a quick sale, you’re buying insurance for your audio investment. We take pride in building systems that push creative boundaries without compromising safety or functionality. If you want to ensure your audio is crisp, clear, and perfectly calibrated, schedule a consultation with our audio specialists today. Let’s make sure your system has the electrical foundation it needs to perform at its peak.
Protect Your Sound and Your Investment
Your car audio system is a significant investment in your daily driving experience. Understanding car amplifier clipping symptoms is the best way to prevent the electrical stress that leads to permanent hardware failure. We’ve explored how clipping creates dangerous heat and how technical tools like oscilloscopes provide the precision needed to find your system’s safe limits. A truly high-performance system requires a balance between power and protection.
We’ve been delivering these finished results since 1994. Our team specializes in the custom fabrication and electrical integration required to deliver a finished result that keeps your audio crisp and your components cool. As authorized dealers for the world’s most premium brands, we focus on solution-oriented tuning that prioritizes reliability over a quick sale. Don’t let distortion dampen your drive or destroy your speakers.
Experience the Music In Motion Difference; Get Expert Tuning Today. We’re here to help you push creative boundaries while ensuring every detail of your property is in safe hands. Let’s build a system that sounds incredible every time you turn the key.
Frequently Asked Questions
Can clipping blow my speakers even if the volume isn’t that loud?
Yes, you can destroy speakers at low volumes if your gain settings are incorrect. Clipping happens when the amplifier’s power supply can’t keep up with the requested output, regardless of the physical position of the volume knob. This sends a distorted, heat-heavy signal to your speakers that melts voice coils. We focus on proper gain matching to ensure your hardware stays safe at every listening level.
Is a little bit of clipping okay for short periods?
No, there is no safe amount of clipping for your audio components. Even brief periods of signal squaring generate excessive heat that doesn’t have time to dissipate. This cumulative thermal stress eventually leads to car amplifier clipping symptoms like a burnt smell or total speaker failure. We recommend tuning your system so that you never hit the electrical ceiling, providing a much more reliable finished result.
Does a clipping light on my amp mean I need to turn it down immediately?
Yes, a solid or frequently flickering clipping light is a direct warning to lower the volume. These LEDs are designed to tell you that the amplifier has run out of headroom and is now outputting a dangerous square wave. While an occasional blink on the heaviest bass notes might be acceptable in some systems, a steady light means you are actively cooking your speakers and need immediate recalibration.
Why does my amp clip only when the bass hits?
Bass frequencies require the most energy and current from your vehicle’s electrical system. When a heavy kick drum or low synth note hits, the amplifier demands a massive burst of power. If your battery or alternator can’t provide that current, the voltage drops and the signal flattens out. This is why many car amplifier clipping symptoms only appear during bass-heavy tracks where the power supply is under the most strain.
Can a low-quality RCA cable cause clipping?
Low-quality RCA cables typically don’t cause clipping directly, but they can introduce noise that makes you turn the gain up too high. If a cable has poor shielding or high resistance, the signal reaching the amp is weak. Users often compensate by over-adjusting the gain, which leads to clipping. We use premium interconnects to ensure a clean, strong signal reaches the amplifier from the start.
What is the difference between clipping and distortion?
Clipping is a specific type of electrical distortion that occurs when a signal is cut off at the peaks. Distortion is a broad term for any unwanted change in the original audio signal. While all clipping is distortion, not all distortion is clipping. For example, a speaker can distort mechanically if it’s pushed beyond its physical excursion limits, even if the electrical signal from the amplifier remains clean.
Will adding a capacitor stop my amp from clipping?
A capacitor can help stabilize voltage during quick bass hits, but it won’t fix an improperly tuned amplifier. If your gain is set too high, the amp will clip regardless of how much stored energy is available. We view capacitors as a supplemental tool for electrical stability. For high-wattage systems, a high-output alternator or a Big Three wiring upgrade is usually a more effective solution for preventing electrical starvation.
How do I know if my head unit is clipping the signal?
The most accurate way to check your head unit is with a professional tool like an oscilloscope or a DD-1. You connect the tool to the RCA outputs and gradually increase the volume. Most factory and aftermarket stereos begin to clip their internal signal between 75% and 90% of their maximum volume range. Once we find that max clean point, we use it as the baseline for the entire installation.