What if the most important component in your vehicle’s sound system isn’t the speakers themselves, but a piece of software you haven’t mastered yet? For many enthusiasts, car audio DSP tuning for beginners feels like trying to solve a complex puzzle in the dark. You’ve invested in high-quality hardware, but the music still feels trapped in the footwells, muffled and one-dimensional. It’s completely normal to feel overwhelmed by technical jargon like slopes and Q-factor, or to worry that one wrong click might accidentally fry a delicate tweeter.
We believe that high-performance audio should be accessible, not intimidating. We’ve developed this guide to help you transform that muddy output into a magnificent, lifelike soundstage. By following a logical sequence of protection, placement, and polish, you can achieve a professional-grade result that puts the performer right on your dashboard. This article provides a clear workflow for using your DSP software with total confidence. We will cover everything from setting safe crossover points to fine-tuning time alignment and equalization, ensuring your daily drive becomes the best seat in the house.
Key Takeaways
- Understand how a DSP acts as the brain of your system to fix the acoustic nightmares created by glass reflections and off-axis speaker placement.
- Master a structured workflow for car audio DSP tuning for beginners to protect your equipment and achieve a magnificent soundstage.
- Learn to set safe crossover frequencies and gain levels to ensure your speakers perform at their peak without the risk of damage.
- Discover how to use time alignment and EQ to lift the sound from the floor and place it directly in front of you.
- Evaluate the limits of tuning by ear and learn why professional calibration often provides the finished result you’re looking for.
What is a Car Audio DSP and Why Does Your System Need One?
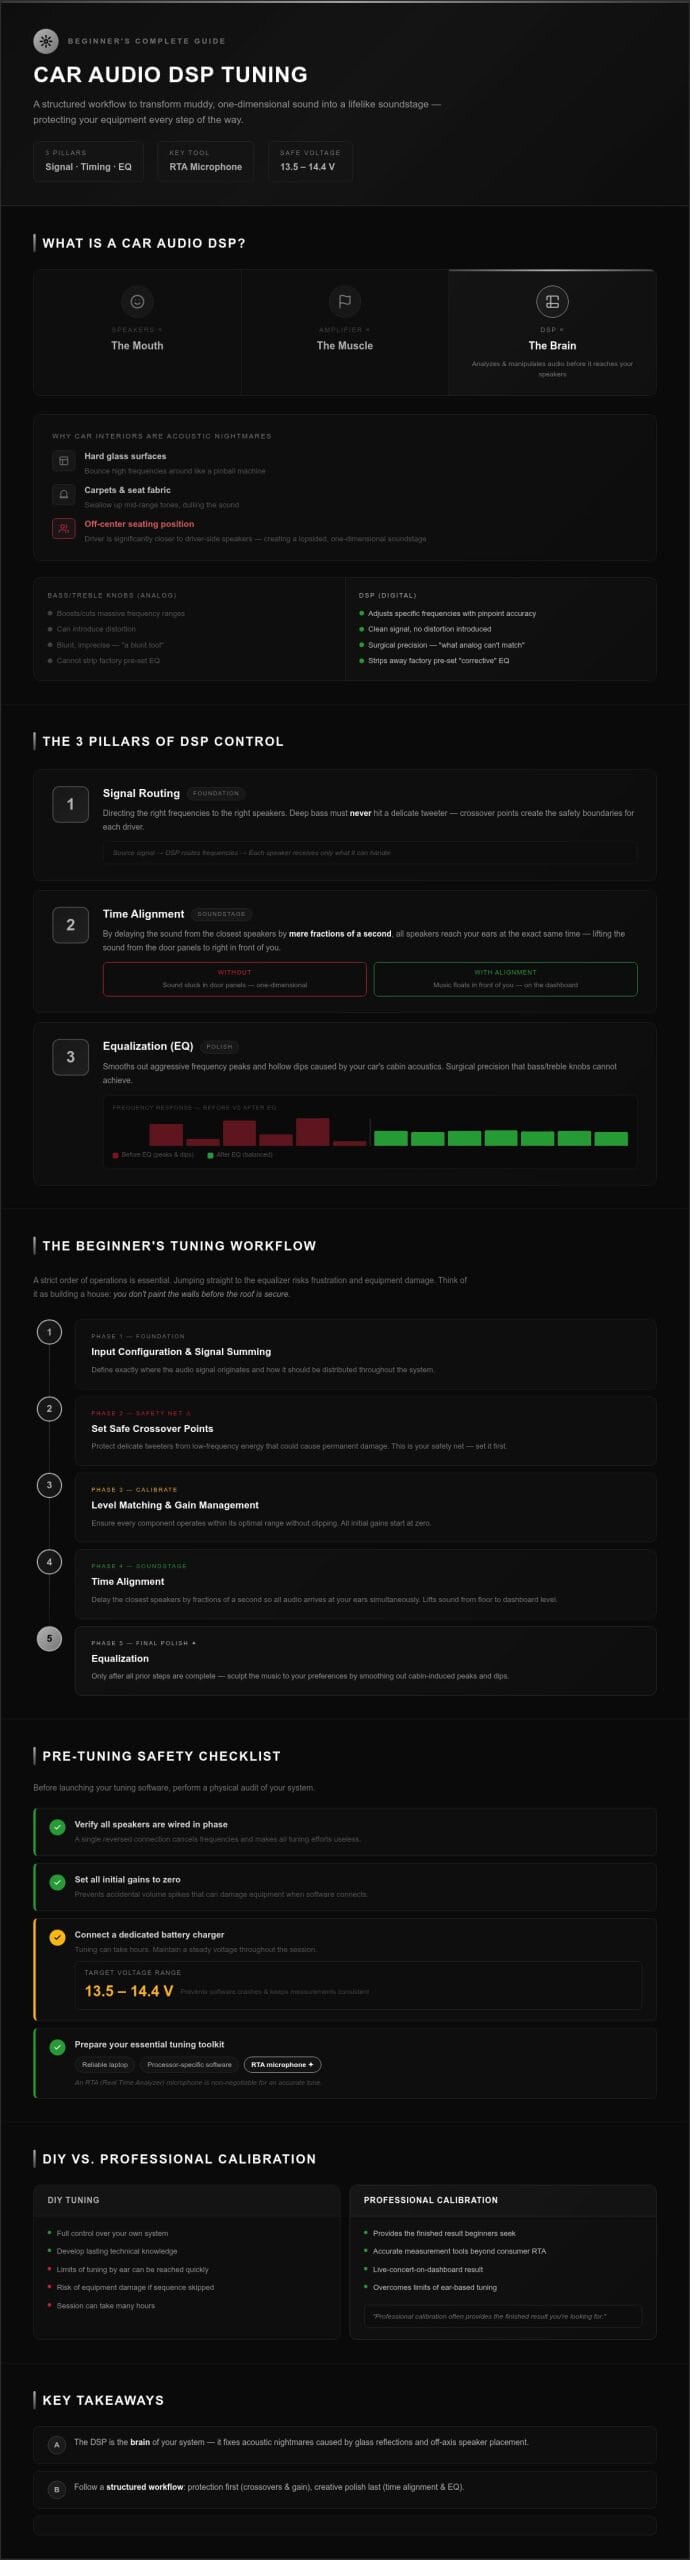
Think of your car’s audio system as a body. The speakers are the mouth, the amplifier is the muscle, and the digital signal processor (DSP) is the brain. Without a brain, those muscles don’t know how to move efficiently or accurately. A DSP takes the raw audio signal from your source and analyzes it in real-time. This allows us to manipulate every aspect of the sound before it ever reaches your speakers. When we talk about car audio DSP tuning for beginners, we’re really talking about taking back control of an environment that was never designed for high-fidelity sound.
Car interiors are acoustic nightmares. You’re surrounded by hard glass surfaces that bounce high frequencies around like a pinball machine. You have thick carpets and seat fabrics that swallow up mid-range tones. Most importantly, you aren’t sitting in the middle of the vehicle. You’re tucked away on the left side, significantly closer to the driver-side speakers than the passenger-side ones. This creates a lopsided, one-dimensional soundstage where the music feels like it’s stuck in your door panels rather than floating in front of you. A DSP uses digital correction to overcome these physical hurdles, effectively “tricking” your ears into hearing a perfectly balanced performance.
The Three Pillars of DSP Control
To achieve a professional result, we focus on three core functions within the DSP software. First is signal routing, which involves directing the right frequencies to the right speakers. We don’t want deep bass hitting a delicate tweeter. Second is time alignment. By delaying the sound from the closest speakers by mere fractions of a second, we make the music from every speaker reach your head at the exact same time. Finally, we use equalization to smooth out the aggressive peaks and hollow dips caused by your car’s cabin. These three pillars are the foundation of car audio DSP tuning for beginners.
DSP vs. Traditional Analog Tuning
You might wonder why the bass and treble knobs on your dashboard aren’t enough. Those are blunt tools; they boost or cut massive ranges of sound and often introduce distortion. When we perform a car audio upgrade for stock stereo, a DSP is the only way to strip away the factory’s pre-set “corrective” EQ. Digital tuning offers surgical precision that analog dials can’t match. We can adjust specific frequencies with pinpoint accuracy, ensuring your signal remains clean and your hardware stays protected. Whether you choose a standalone processor or a DSP-integrated amplifier, the goal remains the same: delivering a finished result that sounds like a live concert on your dashboard.
The Beginner’s DSP Tuning Workflow: A Logical Sequence
Success in car audio DSP tuning for beginners relies on a strict order of operations. Jumping straight to the equalizer is a recipe for frustration and potential equipment damage. We always follow a logical path that moves from foundational protection to creative refinement. This structure ensures that your system stays safe while you hunt for that perfect soundstage. Think of it as building a house; you don’t paint the walls before the roof is secure.
The workflow begins with input configuration and signal summing. We define exactly where the audio signal originates and how it should be distributed. Next, we establish safe crossover points. This acts as your safety net. By setting these boundaries early, we protect delicate tweeters from low-frequency energy that could cause permanent damage. Once the speakers are safe, we move to level matching and gain management. This ensures every component operates within its optimal range without clipping. Only after these steps are complete do we enter the creative phase of time alignment and EQ, where we finally sculpt the music to match your preferences.
Preparation and Safety Checks
Before you launch your tuning software, perform a physical audit of your system. Verify that every speaker is wired in phase. A single reversed connection can cancel out frequencies and make your tuning efforts useless. We also set all initial gains to zero to avoid accidental volume spikes. Tuning is a detailed process that can take hours, so we always use a dedicated battery charger. Maintaining a steady 13.5 to 14.4 volts prevents software crashes and ensures your measurements remain consistent throughout the session.
The Essential Tuning Toolkit
You need a reliable laptop with the correct software for your specific processor. Most 2026 interfaces are intuitive, but they still require a steady hand. An RTA (Real Time Analyzer) microphone is non-negotiable for an accurate tune. It provides a visual representation of how sound behaves inside your cabin, allowing you to identify problems that your ears might overlook. We use pink noise tracks to feed a constant signal into the system, which makes it easier to see how adjustments affect the overall response. If you’re looking for a professional touch to maximize your system’s potential, our experts at Music In Motion can provide the precision calibration needed for a truly magnificent result.
Setting the Foundation: Crossovers and Gain Management
Crossovers act as the traffic controllers of your audio system. They ensure that every speaker receives only the frequencies it was designed to handle. In car audio DSP tuning for beginners, mastering these filters is the difference between a crisp, clear system and a pile of smoke. We use High Pass Filters (HPF) to keep deep bass away from small speakers and Low Pass Filters (LPF) to keep high notes out of your subwoofers. Bandpass filters are used for mid-range drivers to block both the extreme highs and the lowest lows simultaneously.
The slope of a crossover determines how aggressively it cuts off the sound. Measured in decibels per octave (dB/octave), a shallow 12dB slope allows for a gentle blend, while a steep 24dB slope acts more like a brick wall. Most beginners find success with a 24dB Linkwitz-Riley slope because it provides a predictable phase response and superior protection. Once your filters are set, we focus on level matching. This involves adjusting the individual volume of each speaker so the tweeters don’t overpower the woofers. We want a balanced output where no single driver draws attention to itself, creating a unified wall of sound.
Protecting Your Tweeters
Tweeters are delicate. They are the most vulnerable component in any DSP setup because they cannot handle the physical movement required by low frequencies. For a standard 1-inch silk dome tweeter, a safe starting point is usually around 3,500 Hz. Metal domes can often play slightly lower, but we recommend staying above 3,000 Hz until you’re fully comfortable with your software. Using a steep 24dB slope during this learning phase provides an extra layer of security. It ensures that stray low-frequency energy doesn’t overheat the voice coil while you experiment with your settings.
Blending the Subwoofer with the Front Stage
Our goal is to make the bass feel like it’s coming from the dashboard, even though the subwoofer is likely in the trunk. This is achieved by finding the perfect crossover point between your mid-bass drivers and the sub, typically between 60 Hz and 80 Hz. If the bass feels disconnected or “slow,” we adjust the phase settings. Flipping the phase 180 degrees often pulls the sound forward instantly. The quality of your car audio fabrication also plays a huge role here. A sturdy, well-built enclosure allows for cleaner crossover transitions, making it much easier to achieve that seamless blend during car audio DSP tuning for beginners.
Creating the Soundstage: Time Alignment and EQ
Once your speakers are protected and level-matched, we move into the most rewarding phase of car audio DSP tuning for beginners. This is where we manipulate the laws of physics to create a lifelike soundstage. We start with the “Tape Measure” method. It sounds simple because it is. You measure the distance from your ears to each individual speaker in the vehicle. The speaker furthest away, usually the subwoofer or the passenger-side kick panel, becomes your zero-point baseline. You then add delay to the closer speakers so the sound from every driver reaches your head at the exact same millisecond. This simple adjustment is what moves the music from the door panels to the top of your dashboard.
After timing is set, we use the Parametric EQ (PEQ) to sculpt the tone. Unlike a basic graphic EQ, PEQ gives us total control over the frequency, the gain, and the “Q-factor.” We always follow the “Subtract First” rule. If a certain frequency sounds harsh or overbearing, we cut it rather than boosting the surrounding frequencies. Boosting consumes your amplifier’s headroom and often leads to signal clipping. By focusing on surgical cuts, we maintain signal integrity and ensure a much cleaner finished result. If you find the software interface intimidating, our team at Music In Motion can perform a professional calibration to ensure your system reaches its absolute peak performance.
Nailing the Center Image
A perfect tune should make the singer sound like they are standing right on your hood, directly in the center of the windshield. To achieve this, we use a mono vocal track. If the voice leans too far to the left, we add a tiny bit more delay to the driver-side speakers. We adjust in small increments, usually 0.02ms at a time, until the image snaps into focus. A common mistake is over-delaying the near-side speakers, which can make the soundstage feel unnaturally wide but hollow in the middle. Your ears are the ultimate judge here; trust what you hear more than the numbers on the screen.
Smoothing the Frequency Response
We use the RTA microphone to identify aggressive peaks that cause listening fatigue. These peaks often show up as sharp mountains on your frequency graph. This is where the Q-factor becomes vital. A high Q-factor creates a narrow, needle-like adjustment to kill a specific resonance without affecting the notes around it. Conversely, a low Q-factor provides a broad, gentle slope for general tonal balance. We aim for a “Target Curve” that typically features a slight boost in the low end and a gentle roll-off in the high frequencies. This creates a warm, natural sound that mimics a high-end home listening room rather than a sterile laboratory.
When to DIY vs. Investing in Professional Calibration
The learning curve for DSP software is steep, but the journey is incredibly rewarding. For many enthusiasts, car audio DSP tuning for beginners starts as a hobby and evolves into a passion for perfect sound. There is a unique satisfaction in watching your soundstage snap into focus after hours of careful adjustment. However, every DIY tuner eventually reaches a plateau where their ears can no longer distinguish the fine details needed for a truly elite result. This is the moment when taking the training wheels off means seeking a professional perspective to unlock the final ten percent of your system’s potential.
We often see customers who prefer a hybrid approach. They handle the physical installation and initial setup, then bring the vehicle to us for a “final tune” session. This is a smart way to manage your budget while ensuring your hardware is utilized correctly. Investing in premium car audio components is only half the battle; the other half is the calibration that keeps those components safe. A professional tuner uses laboratory-grade measurement equipment that is far more sensitive than the human ear, allowing for a level of precision that prevents long-term equipment fatigue and maximizes your investment. This structured approach is the gold standard for car audio DSP tuning for beginners who want a guaranteed finished result.
The Professional Advantage
Professional calibration goes beyond simple EQ cuts and time delay. We utilize advanced techniques like phase correction and all-pass filters to solve complex acoustic cancellations that basic software settings cannot address. Our experts also bring years of experience in identifying mechanical issues. If a door panel has a specific resonance at 150 Hz, we can hear the difference between a tuning peak and a physical rattle that requires sound deadening. This level of insight provides peace of mind, ensuring your system is reliable, stays within its warranty parameters, and performs consistently every time you turn the key.
Next Steps for Your Audio Journey
As you grow more comfortable with your system, you can begin exploring multi-seat tuning presets. These allow you to switch the focus of the soundstage from a driver-centric “sweet spot” to a balanced presentation for the whole family. You might also consider upgrading to higher-resolution DSP hardware as your ears become more refined. Whatever your goals, we are here to act as your partner in customization. You can consult with our specialists at Music In Motion to create a custom calibration plan that fits your specific vehicle and listening preferences, ensuring your audio journey never hits a dead end.
Transform Your Drive with Digital Precision
Mastering your DSP means moving beyond basic hardware installation to achieve a true acoustic transformation. We’ve explored how a structured workflow, from safe crossover foundations to surgical EQ cuts, turns a muddy soundstage into a lifelike performance. Car audio DSP tuning for beginners isn’t just about software; it’s about the patience to follow a logical sequence that protects your speakers while elevating your music.
At Music In Motion, we specialize in custom fabrication and the professional integration of high-performance electronics. While DIY tuning is a great way to learn your system’s limits, our team focuses on the finished acoustic result to ensure your vehicle sounds exactly as the artist intended. We bridge the gap between technical precision and your daily driving experience, providing the expertise needed for complex custom projects.
Ready for the ultimate sound experience? Let our experts dial in your system today. Your journey toward a magnificent soundstage is well within reach, and we are excited to help you cross the finish line with confidence.
Frequently Asked Questions
Can I tune a car audio DSP without a microphone?
You can certainly set up basic crossovers and time alignment using a tape measure, but a microphone is essential for accurate equalization. Without a Real Time Analyzer (RTA) mic, you’re essentially guessing which frequencies are bouncing off your windows. We recommend using a calibrated mic to visualize the soundstage, ensuring your car audio DSP tuning for beginners moves beyond guesswork into professional-grade precision.
Will a DSP make my factory speakers sound better?
A DSP will significantly improve the performance of factory speakers by stripping away the manufacturer’s pre-set compromises. It acts as the brain of your system, allowing us to fix the lopsided timing and aggressive EQ curves found in stock head units. While we often suggest a full speaker upgrade, adding a processor is the most effective way to extract every bit of potential from your original equipment.
What is the best crossover slope for a beginner to use?
We recommend starting with a 24dB per octave Linkwitz-Riley slope for almost every application. This steep slope acts as a reliable safety net, protecting your tweeters from low-frequency energy while providing a predictable phase response. It makes blending speakers much easier for those just starting out. You can experiment with shallower 12dB slopes later, but the 24dB setting offers the most stability during your initial learning phase.
How do I know if I’m clipping my DSP signal?
Most modern DSP software interfaces include red warning indicators that flash when the input or output signal exceeds its limits. You should also listen for audible distortion, which often sounds like a harsh, fuzzy texture during loud passages. Keeping your gains set to zero at the start and using a steady power source helps prevent these issues. If those red lights stay on, you’re risking hardware damage and need to dial back your output levels.
Can a DSP fix a bad speaker installation?
No software can compensate for a poor physical foundation. If your speakers are mounted on thin, vibrating metal or your subwoofer enclosure has air leaks, a DSP won’t hide those mechanical flaws. We prioritize specialized custom fabrication because a sturdy mounting surface is required for the processor to do its job. You should always address rattles and air-tight seals before you begin the digital calibration process to ensure a magnificent finished result.
Is it possible to blow my speakers with DSP software?
Yes, incorrect settings in your software can permanently damage your hardware. The most common mistake in car audio DSP tuning for beginners is sending deep bass frequencies to a tweeter by setting the crossover too low. Excessive EQ boosts can also drive your amplifier into clipping, which generates heat that fries voice coils. Always double-check your High Pass Filters and follow the subtract first rule when adjusting your equalizer to keep your system safe.
What is the difference between a 10-band and a 31-band EQ?
The difference lies in surgical precision. A 10-band EQ is a blunt tool that affects broad ranges of sound, which isn’t enough to fix the complex reflections inside a car cabin. A 31-band EQ, also known as a 1/3 octave equalizer, allows you to target very specific frequencies with pinpoint accuracy. This level of control is necessary to kill a single resonant peak without muffling the surrounding notes that give the music its natural character.
How much does professional car audio tuning cost?
The cost of professional calibration depends on the complexity of your specific audio system and the time required to achieve a perfect result. A basic five-channel system takes less time than a fully active, multi-speaker setup. While we don’t provide flat rates, we can say that professional tuning is an investment in the longevity and performance of your premium electronics. Many enthusiasts find that a professional final tune provides the clarity they couldn’t reach on their own.